


Hang the bottom of your pendants about a foot to a foot and a half above the countertop, and space them roughly two feet to two and a half feet apart center-to-center. Keep the outer fixtures several inches from the island’s ends, moving farther in for larger shades. Those three numbers are the foundation of every well-lit island. Everything else, from choosing between two pendants and three to fine-tuning for a 9-foot ceiling, builds on that base.
TL;DR:
- Two pendants are recommended for islands measuring 4 to 6 feet, while three pendants suit islands between 6 and 8 feet for balanced lighting.
- Pendant height should be set between 30 and 36 inches above the countertop, with adjustments made based on ceiling height.
- Fixture diameter influences spacing: larger shades require wider centers and end setbacks, potentially lasting from 10 to 12 inches.
- Before drilling, confirm your measurements actual workspace, fixture compatibility, and conduct mock-ups using tape or cardboard templates.
- Adjustable stems and dimmable drivers are essential features for fixtures to ensure proper fit and flexible ambiance in real kitchen settings.
Table of Contents
- How Many Pendants Does Your Kitchen Island Need?
- Spacing Formulas: Do the Math Before You Drill
- What Height Should Pendants Hang Above a Kitchen Island?
- Pendant Size and Visual Balance: The Coverage Rule
- Measuring and Mocking Up Before You Drill a Single Hole
- What Montreal Lighting & Hardware Has Learned From Trade Installs
- Common Pendant Mistakes We See on Install Day
- Shop Adjustable Pendants Built for This Exact Math
- Sources
How Many Pendants Does Your Kitchen Island Need?
Island length drives pendant count more than personal taste does, though taste still gets the final vote. A too-crowded island looks fussy. A too-sparse one looks like the electrician forgot a fixture.
Here’s how it typically breaks down:
- Under 4 feet: One pendant, centered over the workspace, is usually enough. A single larger fixture reads intentional rather than sparse.
- 4 to 6 feet: Two pendants. This is the sweet spot for islands built mainly for seating rather than heavy prep work, since two larger shades create a warm, symmetrical glow over stools without crowding sightlines.
- 6 to 8 feet: Three pendants. This is the most common configuration in North American kitchens, and for good reason. It splits the island into three visually balanced zones and delivers even task light across the whole prep surface.
- Over 8 feet: Four pendants, or a switch to a single linear fixture. Beyond 8 feet, adding a fourth or fifth small pendant risks what designers call the “picket fence” effect, a repetitive row that draws the eye more to the fixtures than the island beneath them.
Odd numbers tend to photograph and feel more resolved than even ones. Three pendants create a natural focal middle; five spreads too thin for most residential islands. That said, two large pendants can be the better call on a seating-heavy island where the fixtures need to double as decor rather than task lighting. Before you settle on a number, think about what the island is actually for. A prep-heavy island wants more, smaller sources of even light. A seating-and-conversation island can carry fewer, bolder ones.
Spacing Formulas: Do the Math Before You Drill
Eyeballing pendant placement is how you end up with a fixture hanging over the sink instead of the seating end. A little arithmetic up front saves a lot of patching later.
For two pendants, the simplest approach splits the island into quarters and hangs each pendant at the one-third mark rather than dead center on each half. Bright Pros recommends this one-third positioning specifically because it avoids the visual gap that occurs when two pendants sit too close to the island’s midpoint. For three pendants, divide the island into four equal sections and hang fixtures at the three interior division points, which naturally centers the whole group over the workspace.
Here’s how that plays out on a real island:
- 72-inch island, three pendants: Divide by three equal 24-inch segments. Each pendant center falls in the middle of its segment, which puts roughly 24 inches between centers and leaves a 12-inch setback on each end.
- 60-inch island, two pendants: Using the one-third method, pendants land at 20 inches and 40 inches from one end, giving you a 20-inch setback and 20 inches between centers.
- 48-inch island, two pendants: Same math, tighter numbers. Centers fall around 16 and 32 inches in, with roughly 16 inches of setback on each side.
A few adjustments matter before you finalize any of this. Measure from the usable countertop surface, not the outer edge of an overhang, since overhangs for seating can throw the centerline off by several inches. Factor in your fixture’s shade diameter too. A 6-inch pendant and an 18-inch pendant need different clearances even on the same island, which is exactly what the next section covers.
What Height Should Pendants Hang Above a Kitchen Island?
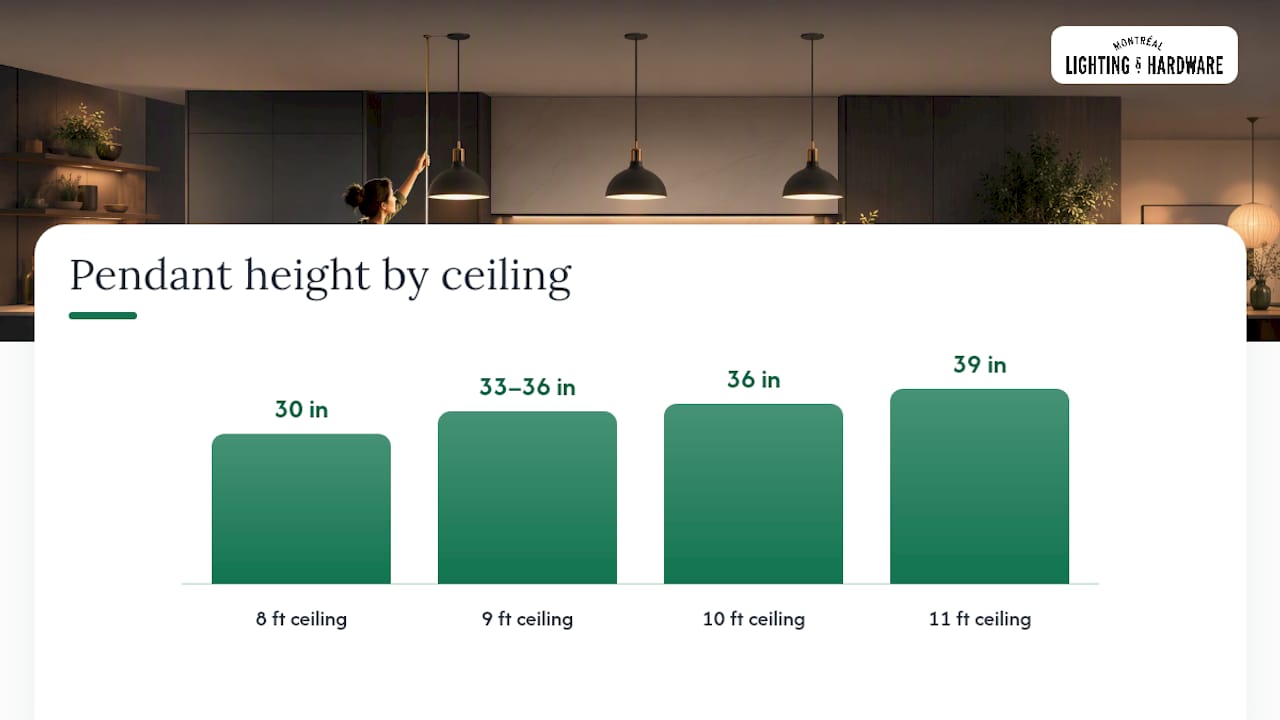
The 30 to 36 inch rule isn’t arbitrary. It’s the range where pendants throw usable task light onto the countertop without anyone clipping their head walking past, and it’s the standard Vatero Bath + Kitchen points to as the baseline for most kitchens. Go lower and you’re staring into a glass shade while you chop vegetables. Go higher and the light washes out before it reaches the surface.
Ceiling height shifts that baseline:
- 8-foot ceilings: Aim toward the lower end, around 30 inches above the counter.
- 9-foot ceilings: Push toward 33 to 36 inches, since the extra height gives you room without making the pendants feel disconnected from the counter.
- Every additional foot beyond 9: Add roughly 3 more inches to keep the proportions looking intentional rather than stranded near the ceiling.
Glass shades and low-profile pendants can hang slightly higher within that range since they scatter light more broadly and don’t create the same shadow well that a deep drum shade does. If your island doubles as bar seating, err toward the higher end of your range so pendants clear sightlines for anyone standing to chat across the counter.
Pro Tip: Buy fixtures with a little extra cord or stem length. It’s a five-minute job to shorten a stem at install, but there’s no clean way to lengthen one you cut too short.
Pendant Size and Visual Balance: The Coverage Rule
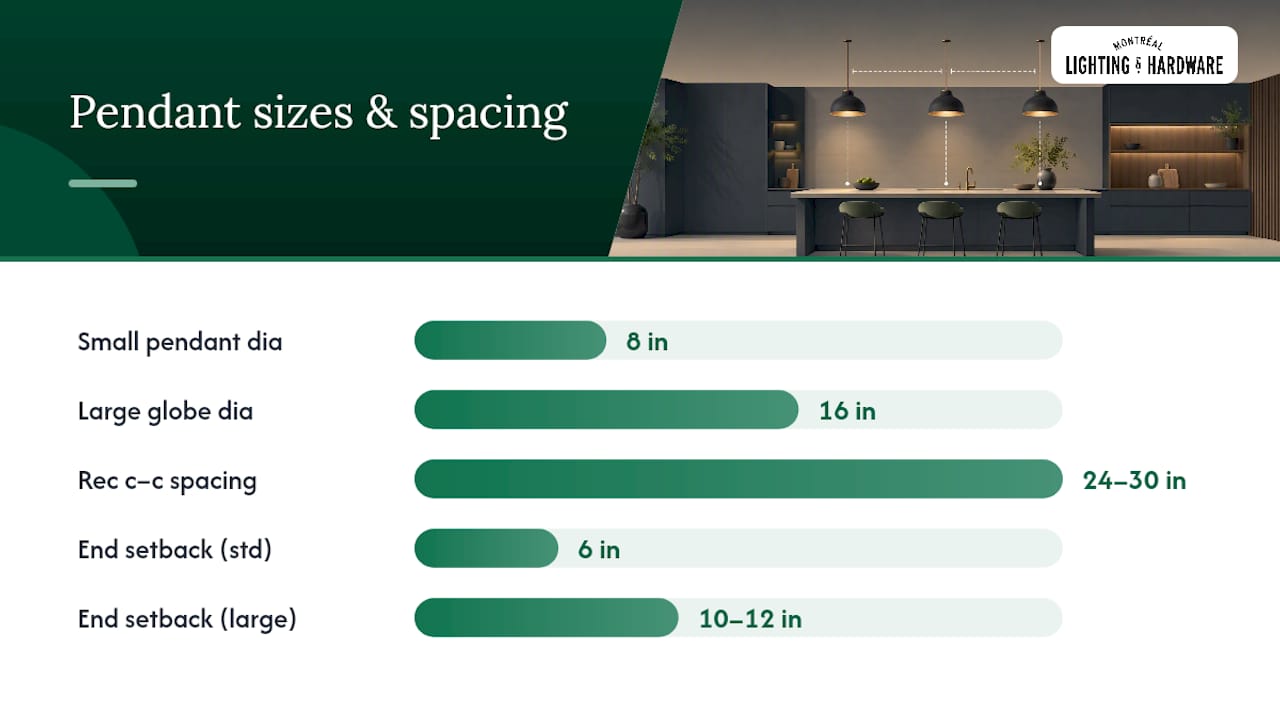
Fixture diameter changes the math just as much as island length does. A cluster of small 8-inch pendants and a pair of oversized 16-inch globes will call for completely different spacing even on identical islands.
A useful rule of thumb: the combined visual width of your pendants, shades and all, should cover roughly two-thirds of the island’s length, not the whole thing. Cover much more than that and the island starts to feel visually top-heavy. Cover much less and the lighting looks like an afterthought floating in empty space above the counter.
Larger shades need more breathing room on every axis:
- Pendants with shades 15 inches in diameter or larger need wider center-to-center spacing, often approaching the top of the 24 to 30 inch range or slightly beyond it.
- End setbacks should grow proportionally too. Quoizel puts the standard minimum at 6 inches from the island’s edge, but that number should climb to 10 or 12 inches once shades get large enough to visually crowd the ends.
- If your math keeps producing spacing that feels tight no matter how you adjust it, that’s usually the signal to switch strategies entirely. Two large pendants, or one continuous linear fixture spanning about half to two-thirds of the island’s length, often solves the crowding problem better than forcing a third small pendant into a space that doesn’t want it.
Measuring and Mocking Up Before You Drill a Single Hole
Getting the numbers right on paper is only half the job. Confirming them in real space, at real height, is what keeps you from patching drywall later.
- Measure the usable surface. Use the actual countertop workspace, excluding any seating overhang, and mark the true centerline of the island.
- Calculate your center points. Apply the divide-by-three or divide-by-four method from the island’s actual usable length, not its overall footprint including overhangs.
- Mock it up before committing. Painter’s tape on the ceiling, cardboard circles cut to shade diameter, or temporary hooks holding string all work. Walk the room, sit at the seating area, and check the view from the main doorway.
- Check the electrical reality. Confirm where the junction box actually sits, how much cord or stem length your chosen fixture includes, and whether your dimmer is compatible with the pendant’s driver before you order anything.
Pro Tip: Stand at the sink, the stove, and every seating spot before finalizing placement. A layout that looks perfect on a tape measure can still put a pendant right in your sightline when you’re actually cooking.
If your renovation involves more than lighting, a well-chosen pantry door can matter just as much to the kitchen’s flow as pendant placement does.
What Montreal Lighting & Hardware Has Learned From Trade Installs
Years of trade orders teach you where measurements go wrong in real kitchens, not just on paper. The most common gap we see is between the fixture someone orders online and the fixture that actually fits their ceiling height once it arrives.
Adjustable stems and extra cord length solve most of that gap before it becomes a problem. It’s far easier to trim six inches off a stem at install than to hunt down an extension for one that’s too short, which is why we point trade clients toward fixtures built with that flexibility from the start. Canopy sizing matters too. A canopy that’s too small for the electrical box it’s covering is a return waiting to happen.
Our trade program gives designers and contractors showroom access to see finishes and scale in person, which matters more for pendants than almost any other fixture type since photos rarely capture true shade diameter. When you’re ordering, ask specifically about dimmable drivers if you want flexibility between prep-time brightness and dinner-time ambiance over the same island.
Common Pendant Mistakes We See on Install Day
The mistake we catch most often is pendants centered on the room instead of the island itself, which looks off the moment someone walks in if the island sits closer to one wall. The fix is simple: recenter over the actual workspace, not the floor plan.
Spacing too tight is a close second, usually from someone splitting an island length evenly without accounting for shade diameter. Three pendants that looked fine on paper can look cramped once the shades are actually hanging. Hanging too low is the third repeat offender, especially with pendants moved over from a dining room where 30 inches above the table is standard.
The remedies are almost always simple: swap to fewer, larger pendants, consider a linear fixture, or shift the group back toward the island’s true center. When the math and the room disagree, trust the room, or bring in a lighting specialist to walk it through with you.
— Montreal Lighting & Hardware
Shop Adjustable Pendants Built for This Exact Math
Once you’ve worked out your spacing and height, the fixture itself needs to cooperate with those numbers, not fight them. Montreal Lighting & Hardware stocks pendants designed with the flexibility this kind of layout demands: adjustable stems, dimmable drivers, and canopy options sized for real installs rather than showroom photos.

The Light Guide Ring LED Pendant is a strong fit for the three-pendant, 24-inch-spacing scenario laid out earlier, with a slim profile that won’t crowd sightlines at bar seating. For islands over 8 feet where a row of small pendants starts to look repetitive, the Cantina LED Pendant works well as a larger single statement or paired option.
Before you order anything, confirm four things: stem or cord adjustability, canopy size against your junction box, dimmer compatibility, and finish match against your existing hardware. If you’re working through a full kitchen plan and want a second opinion on scale before you buy, our trade program team can walk through your measurements with you and point you to the right fixture size for your island.
Sources
A few sources go deeper into the specific standards referenced throughout this guide, useful if you want to double-check your math against a second source before drilling.
Vatero Bath + Kitchen’s guide to pendant spacing lays out the height formula with ceiling-height adjustments in more detail. Bright Pros’ island lighting design guide covers the one-third and quarter-division spacing templates with additional diagrams. Quoizel’s guide to pendant hanging heights breaks down center-to-center spacing and edge setbacks across a range of shade sizes, useful if your fixtures fall outside the standard diameter range covered here.
- Pendant Spacing Over an Island: The Simple Formula – Vatero Bath + Kitchen
- Kitchen island lighting: pendant spacing and height - Bright Pros
- A guide to pendant light hanging heights – Quoizel
