


The best approach to beam ceiling lighting is layering it: uplighting to soften shadows and reveal the wood grain, paired with directional or ambient fixtures sized to fit between the beams. Surface mounts, track and monorail runs, linear LED channels, and pendant clusters tend to be the most versatile fixture families. Beam depth, spacing, and how easily you can get wiring into the ceiling cavity will decide which of those options actually works in your room.
TL;DR:
- Pendant clusters are effective only in beam bays wider than 30 inches, avoiding overcrowding in narrower spaces.
- Recessed fixtures work best when there is enough ceiling depth, as they minimize shadow lines and avoid visual clutter.
- Lighting choices must match ceiling height, beam spacing, wiring access, and the room’s focal points for optimal results.
- LED beam products can serve as primary ambient sources with brightness levels up to 906 lumens per foot at 3500K.
- Layering lighting with general, accent, and dimming controls creates a warmer, more inviting atmosphere than a single fixture can achieve.
Table of Contents
- Beam Ceiling Lighting Ideas Worth Copying
- How to Choose Fixtures for Your Beamed Room
- Placement, Spacing, and Sizing Rules for Fixtures With Beams
- Mounting, Wiring, and Retrofit Options
- Getting the Light Right for Your Wood Tones
- Design Recipes for Different Beam and Finish Combinations
- Why Layered Beam Lighting Beats a Single Statement Fixture
- Products and Next Steps for Your Beam Lighting Project
- Sources
Beam Ceiling Lighting Ideas Worth Copying
Exposed beams give a room bones. The right fixtures give it a pulse. What separates a beautiful beamed ceiling from a dim, cave-like one usually comes down to how many layers of light you’re using and where you put them, not how expensive the fixtures are. Here are the approaches that show up again and again in the rooms that actually feel warm and finished, not just architecturally interesting.
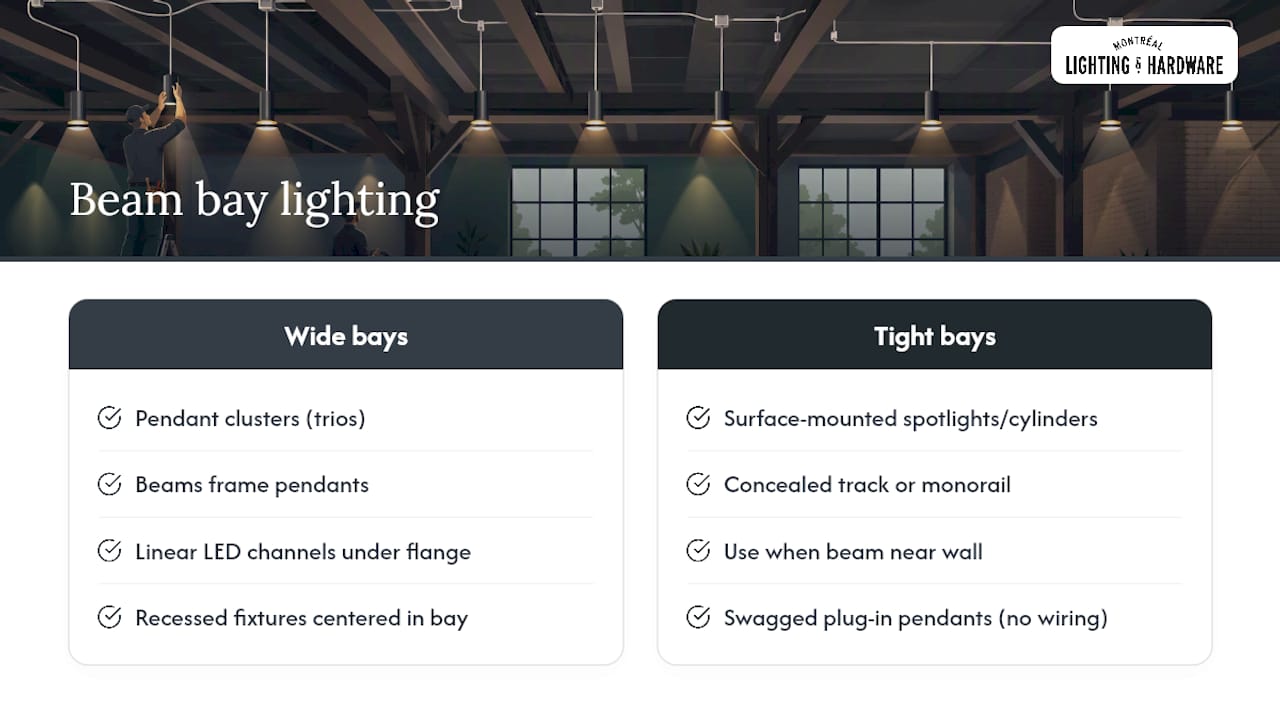
1. Pendant clusters between wide beams. If your beam bays are 30 inches or wider, a trio of pendants hung between two beams over a dining table or kitchen island reads as intentional, not crowded. Group them in odd numbers, vary the drop height slightly, and let the beams frame them like a picture ledge.
2. Linear LED channels set into the beam flanges. Running a slim aluminum channel along the underside edge of a beam, or recessed into a routed groove, throws a continuous wash of light either up toward the ceiling plane or down along the beam face. This is one of the cleanest ways to add ambient light without hanging a single fixture from the beam itself.
3. Surface-mounted spotlights or cylinders on the beam face. Small directional cylinders mounted directly to the side of a beam can aim light at art, a mantel, or a kitchen counter below. They’re low profile, don’t require ceiling penetration, and work well when a beam sits too close to a wall for a pendant.
4. Track or monorail lighting concealed behind a beam valance. Designers favor track and monorail systems for their flexibility, especially when they can hide the rail behind or parallel to a beam so only the light heads are visible. This gives you the ability to redirect light later without an electrician.
5. Recessed fixtures centered between beams. When there’s enough ceiling depth above the beams, recessed cans centered in each bay avoid the harsh shadow lines that happen when a fixture sits too close to a beam edge. This only works with enough plenum space, so confirm what’s above the ceiling before committing.
6. Illuminated faux beams with integrated LED. Manufactured beams built around an LED channel are becoming a real category of their own. Some illuminated beam products deliver up to 906 lumens per foot at 3500K running on a 24VDC system, which is bright enough to serve as the primary ambient source in a room, not just an accent. These let you treat the beam itself as the fixture rather than something you’re lighting around.
7. Industrial exposed-bulb fixtures for rugged, reclaimed-wood spaces. Barn pendants, cage lights, and exposed-filament bulbs pair naturally with rough-hewn or hand-hewn beams. The visible hardware matches the visible construction of the ceiling instead of fighting it.
8. Swagged pendants and plug-in fixtures for rentals. If you can’t run new wiring, a swag pendant with a cord that loops along the beam to a plug can look surprisingly deliberate. This is one of the few beam lighting ideas that requires zero electrical work.
9. Uplighting washed across the beam undersides. Uplighting is one of the most commonly overlooked layers in DIY beam projects, and it’s often the single biggest upgrade you can make. A few well-placed uplights, whether wall-washers, torchieres, or in-cabinet strips aimed upward, remove the flat, low ceiling feeling that beams can create when they’re only lit from below.
A few notes on when not to use certain ideas: pendant clusters need real width to breathe. In bays spaced 24 inches or less, hanging a pendant in every gap turns a ceiling into a picket fence. Surface mounts or a single concealed track run parallel to the beams almost always look better in tight beam rhythms than a repeating row of individual fixtures.
How to Choose Fixtures for Your Beamed Room
Before you fall in love with a fixture on a mood board, run through what your ceiling can actually support. Four questions decide most of it:
- Ceiling height. Rooms under 8 feet need low-profile surface mounts or recessed lighting, not drop pendants that eat into headroom.
- Beam spacing. Wide bays (30+ inches) can handle pendant groups; narrow, frequent beams favor linear or track lighting instead.
- Wiring access. Attic or crawlspace access above the ceiling opens up recessed and hardwired options; a finished ceiling with no access pushes you toward surface mounts and retrofit tactics.
- Focal point and style. Decide if the beams themselves are the star or just the frame for a chandelier, then let the fixture support that decision instead of competing with it.
Matching fixtures to scenarios helps more than generic rules. In a low-ceiling farmhouse kitchen, skip pendants entirely and rely on surface-mounted LED cylinders between beams, plus under-cabinet task lighting. In a vaulted great room with widely spaced beams, a mix of uplighting on the beam undersides and a single statement pendant at the room’s center works better than multiple smaller fixtures fighting for attention (our vaulted ceiling lighting guide covers sizing for that kind of volume). Over a kitchen island framed by two beams, three pendants spaced evenly between them is close to a design cliché at this point, and it’s a cliché because it works.
Dimming compatibility deserves attention before you buy anything. Not every LED fixture plays nicely with every dimmer, and flicker at low settings is one of the most common callback complaints electricians see. Confirm the driver and dimmer are matched, and lean toward warm-dim LED drivers if you want that cozy, incandescent-style fade at low output.
Pro Tip: If you’re torn between two fixture styles, choose the one with the simpler silhouette. Beams already add visual texture to a ceiling, and an ornate fixture on top of ornate beams usually competes rather than complements.
The most common mistake we see is overcrowding a narrow bay with multiple pendants when a single well-placed surface mount would have done the job with less visual clutter and less installation cost.
Placement, Spacing, and Sizing Rules for Fixtures With Beams
Getting the light right is mostly a matter of following a few dependable rules of thumb rather than guessing.
- Pendant drop height. In rooms with 9 to 10 foot ceilings, the bottom of a pendant should generally land 30 to 36 inches above a table or island surface. In taller, vaulted spaces, the fixture bottom often sits around 8 to 9 feet from the floor, adjusted for furniture height below it.
- Spacing between pendants or linear runs. Space multiple pendants roughly 24 to 30 inches apart center to center, and keep the whole group centered within the beam bay rather than off to one side.
- Distance from beam edges. Keep recessed and surface-mounted fixtures roughly 12 to 18 inches from the nearest beam edge to avoid a sharp shadow line cutting across the light output.
- Kitchen islands. Center the pendant group over the island’s midline, not the room’s midline, since beams rarely align with cabinetry.
- Living areas. Anchor one focal fixture near the seating group’s center and let uplighting fill in the perimeter rather than trying to evenly blanket the whole ceiling.
- Hallways. Small surface mounts spaced every 6 to 8 feet between beams keep sightlines even without the visual noise of a fixture in every single bay.
Mounting, Wiring, and Retrofit Options
Solid timber beams and hollow faux beams call for very different installation strategies, and getting this wrong is where most DIY beam lighting projects stall out.
For solid timber beams, avoid drilling into the wood whenever possible, especially in older or original structural beams. Surface conduit painted to match the beam finish is often the most practical path, or running wire from above if there’s attic access. When beams are original or part of a heritage structure, favor reversible mounting methods and check with a conservation authority before any structural changes.
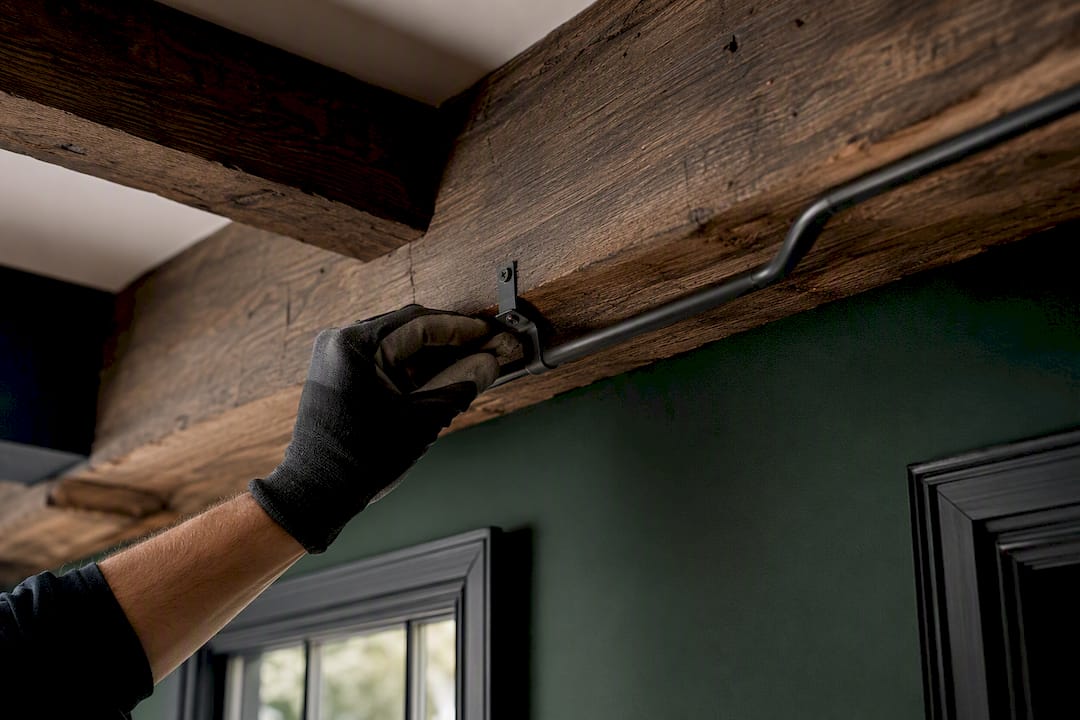
For faux or hollow box beams, you’re in luck: these are usually built with an internal chase specifically for wiring, which makes recessed or fully integrated fixtures far easier to install than in solid timber.
Retrofit-friendly options for renters or anyone avoiding electrical work include:
- Plug-in swag pendants routed along the beam to a nearby outlet
- Battery-powered uplights that clip or stick to the beam top
- Surface-mounted LED cylinders that use a simple junction box
- Paintable wire molding that disappears against the beam’s finish
Pro Tip: If you’re installing LED tape along a beam, don’t skip the aluminum channel. It acts as a heat sink and protects the tape’s adhesive from failing prematurely, which matters far more over a few years than it seems on day one.
Getting the Light Right for Your Wood Tones
Color temperature changes how a beam ceiling reads more than almost any other decision you’ll make. For warm woods like oak, cedar, or reclaimed barn wood, stick to 2700 to 3000K. It keeps the wood looking rich instead of washed out or yellow-green. For lighter, more modern wood tones or whitewashed beams, 3000 to 3500K tends to look cleaner without stripping the warmth entirely.
CRI matters just as much as kelvin. Look for a CRI of 90 or higher whenever you’re lighting wood surfaces. Lower CRI bulbs can flatten grain patterns and make finishes look duller than they are in person.
By the numbers: Some manufactured illuminated beam products output up to 906 lumens per foot at 3500K, running on a 24VDC low-voltage system. That’s a useful benchmark if you’re specifying an LED channel and want to know what “bright enough to be the main light source” actually looks like on paper.
A few more specification notes:
- Always pair beam lighting with a dimmer. Wood grain and texture read best under varied light levels, not one fixed brightness.
- Warm-dim LED drivers mimic the way incandescent bulbs fade toward amber at low settings, which flatters timber far more than a cool white dimming down.
- Match kelvin across all fixtures in the same room. Mixing 2700K pendants with 4000K recessed cans is one of the fastest ways to make a beamed ceiling look unfinished.
Design Recipes for Different Beam and Finish Combinations
Pairing the right fixture family with your beam’s finish makes the whole ceiling feel considered instead of assembled piece by piece.
- Modern oak beams: matte black linear pendants or a slim LED channel keep the look architectural and current.
- Dark-stained beams: warm brass chandeliers or brass-toned uplights add contrast and a touch of traditional warmth.
- Painted white beams: recessed uplighting plus minimalist pendants keeps the ceiling airy and avoids visual clutter.
- Illuminated faux beams: integrated LED channels create a continuous glow that turns the beam into the light source itself.
Why Layered Beam Lighting Beats a Single Statement Fixture
Most people buying their first beamed-ceiling light fixture reach for one big, beautiful chandelier and call it done. That instinct is understandable and almost always the wrong call. A single fixture, no matter how striking, leaves the corners of the room in shadow and does nothing to soften the beams themselves, which is usually the part of the ceiling that needs the most help.
The rooms that photograph well and, more importantly, feel good to sit in at 9 p.m. on a Tuesday are the ones layering three things: a source of general ambient light, a directional or accent layer aimed at the beams or a focal point, and dimming control tying it together. That’s not a design trend. It’s closer to a physics problem about how light bounces off timber versus how it disappears into it.
Our trade program exists largely because of conversations like these, where a homeowner or a designer needs a second opinion on spacing, wiring access, or which fixture family will actually work with the beam depth they’ve got, not the one they wish they had.
— Montreal Lighting & Hardware
Products and Next Steps for Your Beam Lighting Project
Once you know the approach you want, the next step is finding fixtures that fit both the beam layout and the finish you’re chasing. Montreal Lighting & Hardware stocks a wide selection built for exactly this kind of work, from surface mounts small enough for a shallow beam bay to statement pendants for wide-set beams over an island or table.

The Sonneman Light Guide Ring LED Pendant is a strong fit for dining spaces framed by wide timber beams, while the Sonneman Zoom LED Surface Mount works well mounted directly to a beam face in tighter bays. Looking for something more compact and classic? The Crystorama Hulton two-light ceiling mount and the Crystorama Fulton three-light ceiling mount both handle rooms where recessed lighting isn’t an option. If you’re coordinating trim and finish details alongside your fixtures, current interior door design trends are worth a look too.
Designers and renovators working on a full project can access trade pricing and layout support through our trade program, and our showroom is open for anyone who wants to see finishes and fixture scale in person before committing. Visit Montreallighting to browse the full catalog or reach out for help planning your specific beam layout.
Sources
- Decorative Illuminated Ceiling Beams - Altispace Ceiling Baffles
- Lighting Beamed & Timber Ceilings: A Style-Smart Guide for Character Homes - The Lighting Company
- Exposed Beam Ceiling Lighting Ideas to Inspire - Maisonly Interior Design
