


For most outdoor landscaping, accent walls, and roofline lighting, low-voltage (12V or 24V) is the smarter pick. For general room lighting, security floods, or any run over 100 feet, line-voltage (120V) does the job better. The right choice comes down to output needs, wire run length, and how much installation complexity you’re willing to take on. The comparison below breaks down exactly where each one shines.
TL;DR:
- Low-voltage systems are ideal for landscape, roofline accents, and outdoor decorative lighting up to about 75 feet, thanks to reduced voltage drop.
- Line-voltage fixtures are better suited for interior lighting, security floods, and runs exceeding 100 feet, where high power and output are needed.
- Installation costs for low-voltage systems are generally lower due to simpler wiring and fewer permits, whereas line-voltage setups require conduit, GFCI protection, and licensed electricians.
- Proper transformer sizing and wire gauge are critical for low-voltage projects to prevent dimming and voltage drop issues during long runs.
- Most homes operate both systems simultaneously: low voltage outside for landscaping and roofline, and line voltage inside for general lighting.
Table of Contents
- Low Voltage vs Line Voltage: A Side-by-Side Comparison
- The Real Trade-Offs: Pros and Cons of Each System
- What Installation, Permits, and Safety Actually Cost You
- Transformers, Voltage Drop, and Why 24V Often Wins
- How to Choose the Right Voltage for Your Project
- How Montreal Lighting & Hardware Supports Your Project
- Our Take: Stop Overthinking the Voltage Decision
- Find Fixtures Built for Either System
- Sources
Low Voltage vs Line Voltage: A Side-by-Side Comparison
Every lighting project starts with one electrical fact: your home runs on 120V line voltage, and any low-voltage fixture needs a transformer to step that power down to 12V or 24V. That transformer is the heart of every low-voltage system, whether it’s a small plug-in puck for landscape lights or a hardwired unit feeding an entire roofline.
Once you know that, the rest of the comparison gets easier to picture:
- Power source: Line voltage runs straight from your home’s electrical panel. Low voltage always passes through a transformer first.
- Typical use: Line voltage handles interior fixtures, ceiling lights, and high-output security floods. Low voltage handles landscape paths, garden accents, roofline trim, and under-cabinet strips.
- Safety profile: Low-voltage wiring under 30V is considered touch-safe and poses minimal shock risk even in wet soil. Line voltage carries real shock and fire risk if wiring is damaged or improperly sealed.
- Installation complexity: Line voltage generally requires conduit, GFCI protection, and often a permit and licensed electrician. Low voltage skips most of that in many jurisdictions, which is why it’s the DIY-friendlier of the two.
- Cost pattern: Line voltage has no transformer to buy, but trenching, conduit, and labor add up fast. Low-voltage installs often cost less overall for landscape projects once you factor in the lighter installation footprint.
Neither system is “better” in the abstract. They’re built for different jobs, and picking wrong just means paying for capability you don’t need or fighting limitations you didn’t expect.
The Real Trade-Offs: Pros and Cons of Each System
Every homeowner we talk to eventually asks the same question: what am I actually giving up by choosing one system over the other? Here’s the honest answer.
- Low voltage: the upside. It’s safer around kids, pets, and wet garden beds, easy to reposition as your landscaping changes, and pairs naturally with efficient LED fixtures for long fixture life.
- Low voltage: the catch. You’re dependent on a properly sized transformer, and voltage drop limits how far a single run can stretch before fixtures at the end start looking dim.
- Line voltage: the upside. No transformer to size or maintain, and it handles long runs and high-output fixtures, like security floods, without breaking a sweat.
- Line voltage: the catch. You’re looking at conduit, a permit in many areas, a licensed electrician, and wet-location-rated hardware for anything outdoors. That adds real time and cost to the project.
The pattern holds pretty consistently: low voltage trades raw power for flexibility and safety margin. Line voltage trades installation ease for output and reach.
What Installation, Permits, and Safety Actually Cost You
This is where the two systems really diverge, and where a lot of DIY projects go sideways.
Outdoor 120V wiring typically needs conduit or UF-rated cable buried at proper depth, GFCI protection at the circuit, and in most areas, a permit pulled by a licensed electrician. That’s not bureaucracy for its own sake. It exists because a compromised line-voltage circuit outdoors is a genuine hazard.
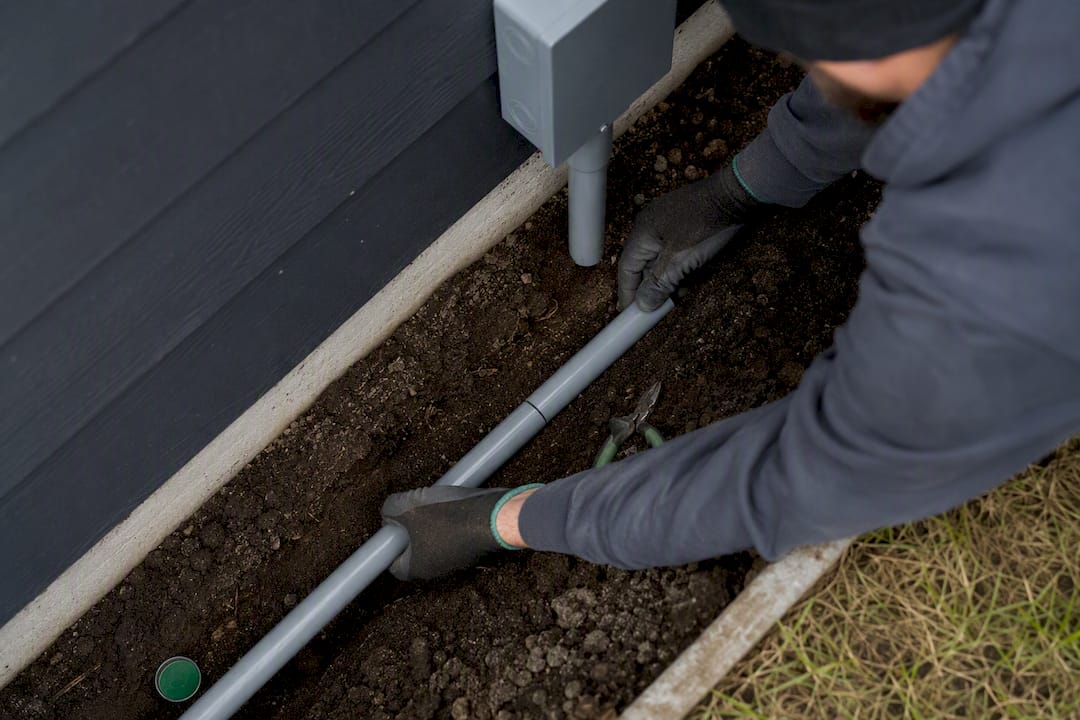
Low-voltage systems fall under what electricians call Class 2 wiring, and that classification matters: anything under 30V is treated as touch-safe, so it usually skips conduit requirements and, depending on your local authority having jurisdiction, may not need a permit at all. That’s a big part of why low voltage dominates the DIY landscape lighting market.
Before you call anything finished, check these:
- The transformer has a weatherproof enclosure rated for outdoor exposure.
- Every outdoor 120V outlet feeding your system has GFCI protection.
- Wire connections are sealed, not just taped or twisted.
- Fixture housings are rated for wet or damp locations as needed.
Pro Tip: If you’re running new 120V circuits, splicing into your panel, or unsure whether your area requires a permit, hire a licensed electrician before you dig. A failed inspection costs more than doing it right the first time.
Transformers, Voltage Drop, and Why 24V Often Wins
A transformer’s job is simple: take 120V and step it down to a safe, usable 12V or 24V. LED-specific fixtures often pair that transformer with an LED driver, which regulates current so your lights don’t flicker or degrade early. Our LED driver types guide breaks down which driver style fits which fixture if you’re speccing a project yourself.
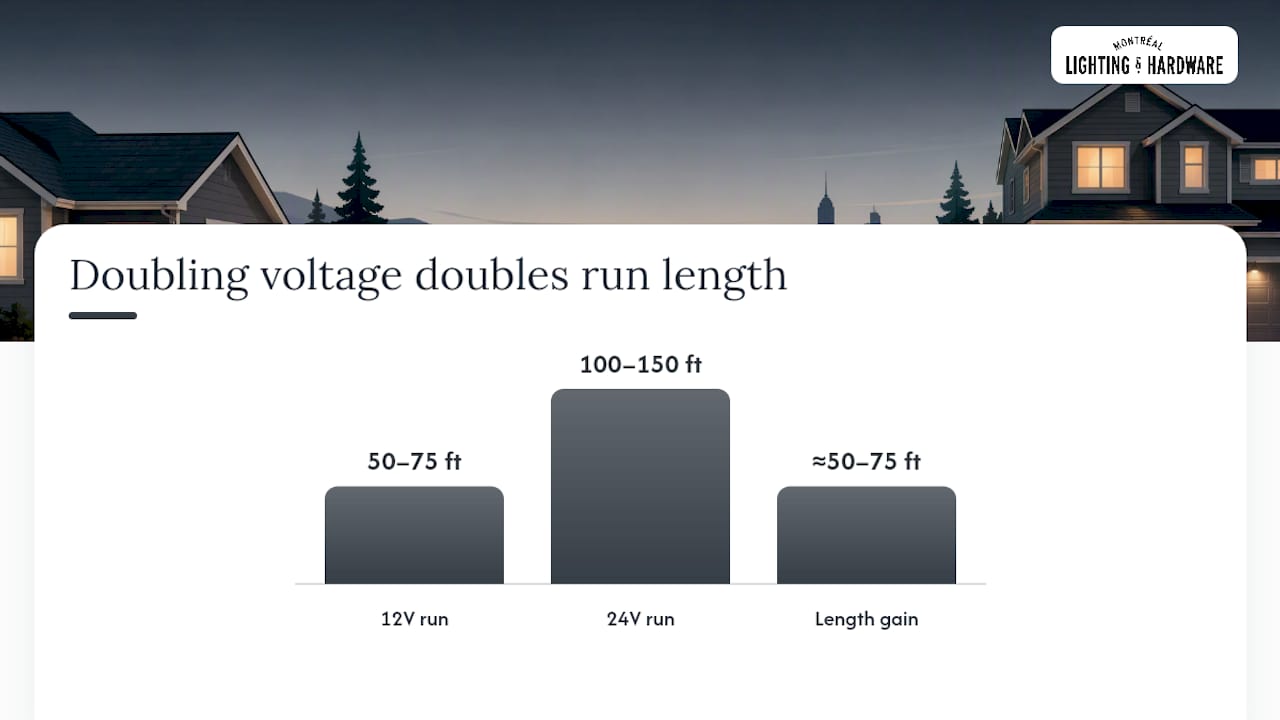
The real technical hurdle is voltage drop: the farther electricity travels down a wire, the weaker it gets, and low-voltage systems feel that more than line voltage does. Doubling the voltage from 12V to 24V halves the current needed for the same wattage, which roughly doubles the practical run length you can achieve with the same wire gauge.
A few practical fixes when you’re planning a longer run:
- Step up to 24V for any continuous run over roughly 50 to 75 feet.
- Use a heavier wire gauge (lower AWG number) to cut resistance.
- Split one long run into two shorter feeds from the transformer instead of daisy-chaining everything.
- Confirm your dimmer or control system is rated for the driver type you’re using; mismatches are a common cause of flicker.
How to Choose the Right Voltage for Your Project
Before you buy a single fixture, answer these questions honestly:
- Is the location indoor or outdoor, wet or dry? Wet locations tilt heavily toward low voltage unless you need floodlight-level output.
- How long is the wire run from power source to the farthest fixture? Under 50 feet, 12V works fine. Longer than that, plan for 24V or line voltage.
- How much light output do you actually need? Decorative path lights and roofline accents rarely need more than low voltage delivers. Security floods and large area lighting usually call for 120V.
- Will you want to move or add fixtures later? Low-voltage systems are far easier to reconfigure than a buried 120V circuit.
- What will you hand your contractor or electrician? Bring total wattage, a rough map of your runs, the fixture types you’re considering, and whether you want app or wall-switch control. Our lighting schedule guide is a useful template for organizing that before your first quote call.
As a rule of thumb: reach for low voltage on landscape paths, garden beds, roofline trim, and accent lighting. Reach for line voltage on tall security floods, detached structures far from the house, or any run pushing past 100 feet.
How Montreal Lighting & Hardware Supports Your Project
Picking the right voltage is only half the job. Matching it to the right fixture, driver, and transformer size is where projects actually succeed or stall. Montreal Lighting & Hardware helps with that piece directly, from transformer sizing to fixture matching across brands like Savoy House and Maxim. If flicker or dimming issues show up after install, our LED flicker troubleshooting guide walks through the most common causes. A typical workflow looks like this: pick your fixtures, size the transformer or driver to match the load, then hand a clean spec sheet to your electrician for final installation.
Our Take: Stop Overthinking the Voltage Decision
The conventional advice treats this like a binary decision, low voltage or line voltage, pick a side. That’s not how real projects work. Most homes end up running both systems side by side: low voltage outside for the landscape and roofline, line voltage inside for the rooms you actually live in.
Where homeowners get tripped up isn’t the voltage choice itself. It’s underestimating voltage drop on long outdoor runs, or assuming “DIY-friendly” means “skip the planning.” A 12V system with a poorly sized transformer or wire gauge will disappoint you just as fast as an unpermitted 120V circuit will get flagged at inspection.
Our advice: settle the run length and output question first, since that decides the voltage almost automatically. Then focus your energy on getting the transformer, driver, and wire gauge right, because that’s where projects actually succeed or fail. The voltage label on the box matters far less than what’s feeding it and how well that math was done before the first fixture went in the ground.
— Montreal Lighting & Hardware
Find Fixtures Built for Either System
Whether your project calls for a low-voltage transformer setup or a hardwired 120V fixture, Montreal Lighting & Hardware carries LED options built for both, with the trade pricing and fast shipping that make sourcing a whole project simpler than piecing it together from multiple suppliers. Our showroom and product team can help confirm driver compatibility and transformer sizing before you order, so you’re not guessing after the boxes arrive.

If you’re planning an indoor upgrade alongside your outdoor lighting, browse the Light Guide Ring LED Pendant from Sonneman, a low-voltage-compatible fixture that pairs well with modern LED drivers. Reach out through Montreal Lighting & Hardware to get product recommendations matched to your project specs before you commit to a cart.
Sources
- Standard and common voltage levels in the US and CA (NEC)
- Low voltage vs line voltage: which outdoor lighting is better? — Canadian Wire Wizards
- Low Voltage vs High Voltage Outdoor Lights — EXTLighting (source highlights)
- 120 Volts vs 12 Volts vs 24 Volts: What Gives? — 1000Bulbs Blog
