


Prioritize layered lighting with a CRI of 90 or higher for food areas, tunable white fixtures, and fully dimmable controls with preset scenes for each service period. Before any purchase order goes out, lock in essential specifications such as a suitable color temperature range for various zones, an appropriate CRI target to ensure quality color rendering, and a dimming protocol that supports compatibility and smooth control. As starting points, dining tables work well at moderate foot-candle levels suitable for dining, bars at a slightly higher brightness level, and kitchen prep surfaces at a level that meets food-safety minimums. Confirm driver and dimmer compatibility before procurement closes — mismatched systems are the single most common cause of flicker and rework.
- Dining zone: 2700K–3000K, CRI ≥ 90, 20–30 fc, dimmable pendants or recessed
- Bar: 2700K–3000K, CRI ≥ 90, 30–50 fc, adjustable accent plus task
- Kitchen/prep: 4000K, CRI ≥ 80, 50 fc minimum (food-safety code), non-dimmable or separately switched
- Outdoor/patio: IP65-rated fixtures, 2700K–3000K, 10–20 fc ambient
Key Takeaways
Effective restaurant lighting design combines layered sources, precise specifications, and scene-based controls to shape guest experience and protect operational performance across every service period.
| Point | Details |
|---|---|
| Layer in sequence | Establish ambient first, then add task, accent, and decorative sources for depth and flexibility. |
| Spec CRI ≥ 90 for dining | High CRI keeps food colors vivid and skin tones warm; 80 minimum for back-of-house. |
| Lock in dimming protocol first | Specify DALI or 0–10V before selecting fixtures to avoid driver incompatibility and flicker. |
| Cross-check kitchen minimums | Kitchen and prep zones require 50 fc or higher; use the LumenCalculator to verify against food-safety thresholds. |
| Montreal Lighting & Hardware | Trade pricing, showroom access, and fast Canadian shipping make it a practical procurement partner for restaurant projects. |
Table of Contents
- Why restaurant lighting design is a commercial decision, not just a mood choice
- How the four layers of light work together in a restaurant
- Spec-ready technical guidance for your design brief
- How to match fixtures and placement to each zone
- Smart controls and energy strategies that work in Canada
- What a restaurant lighting project typically costs and how long it takes
- Where to source fixtures and trade services in Canada
- What we’ve learned from real restaurant lighting projects
- Montreal Lighting & Hardware brings trade-level support to Canadian operators
- Sources
Why restaurant lighting design is a commercial decision, not just a mood choice
Lighting shapes what guests order, how long they stay, and what they spend. Industry coverage from Solais references research finding that guests ordered significantly more calories under dim lighting conditions, a behavioral shift designers use deliberately when shaping mood and dwell time. That single data point reframes the whole conversation: your lighting plan is a revenue lever, not a decorative afterthought.
Beyond ordering behavior, warm, well-layered light makes food look more appetizing. Cooler or flat overhead light can wash out natural colors in a dish, making even a beautifully plated entrée look dull. Guests notice, even when they can’t articulate why. Soft, diffused light at table level also encourages guests to linger, which tends to increase beverage sales and overall check averages.
Operationally, lighting affects staff performance too. Prep zones and service corridors need enough brightness for safe, efficient work. Inspectors checking food-handling areas expect specific minimum light levels, and falling short can mean a failed inspection. Lighting also contributes to the photogenic quality of a space, which matters in an era when guest photos function as organic social media content.
Pro Tip: Never rely on a single overhead source for the entire dining room. A ceiling full of recessed downlights creates flat, shadowless light that feels clinical rather than welcoming. Layer in pendants, sconces, and accent sources to build depth and warmth.
How the four layers of light work together in a restaurant
Start with ambient, then build task, accent, and decorative on top. WebstaurantStore’s practical guidance identifies these four types and explains their distinct roles clearly:
- Ambient lighting sets the overall brightness and mood. Recessed fixtures, cove lighting, and indirect sources typically carry this layer. It establishes the baseline from which everything else reads.
- Task lighting serves function. Under-counter strips at the bar, pendant lights positioned directly over prep surfaces, and focused downlights in the kitchen all fall here. Guests rarely notice task lighting consciously, but they feel its absence.
- Accent lighting creates visual hierarchy. Track heads aimed at artwork, wine displays, or architectural features draw the eye and add dimension. The IES-referenced 5:1 accent-to-ambient ratio gives you a practical target: accent sources should read roughly five times brighter than the ambient field around them to create contrast without glare.
- Decorative lighting communicates personality. A statement chandelier or a cluster of pendants over the bar tells guests something about the brand before they’ve read the menu.
Layering these sources in sequence produces the most consistent results across different service types, as Solais and industry practitioners consistently note. The ambient layer anchors the space; the other three layers give you the flexibility to shift atmosphere from a bright, casual brunch to a warm, intimate dinner service.
Pro Tip: Tunable white fixtures let you shift color temperature across service periods without changing fixtures. Set a cooler 3000K scene for lunch, then warm down to 2700K for dinner. Guests feel the shift as a change in mood, not a change in hardware.
Spec-ready technical guidance for your design brief
The most critical spec calls are CCT, CRI, lumens, beam angle, and dimming protocol. Get these into your RFP before fixture selection begins.
Numeric targets by zone:
| Zone | Target CCT | Min CRI | Target Foot-Candles |
|---|---|---|---|
| Dining room | 2700K–3000K | 90 | 20–30 fc |
| Bar / counter | 2700K–3000K | 90 | 30–50 fc |
| Circulation paths | 3000K | 80 | 10–15 fc |
| Kitchen / prep | 4000K | 80 | 50 fc minimum |
| Outdoor / patio | 2700K–3000K | 80 | 10–20 fc |
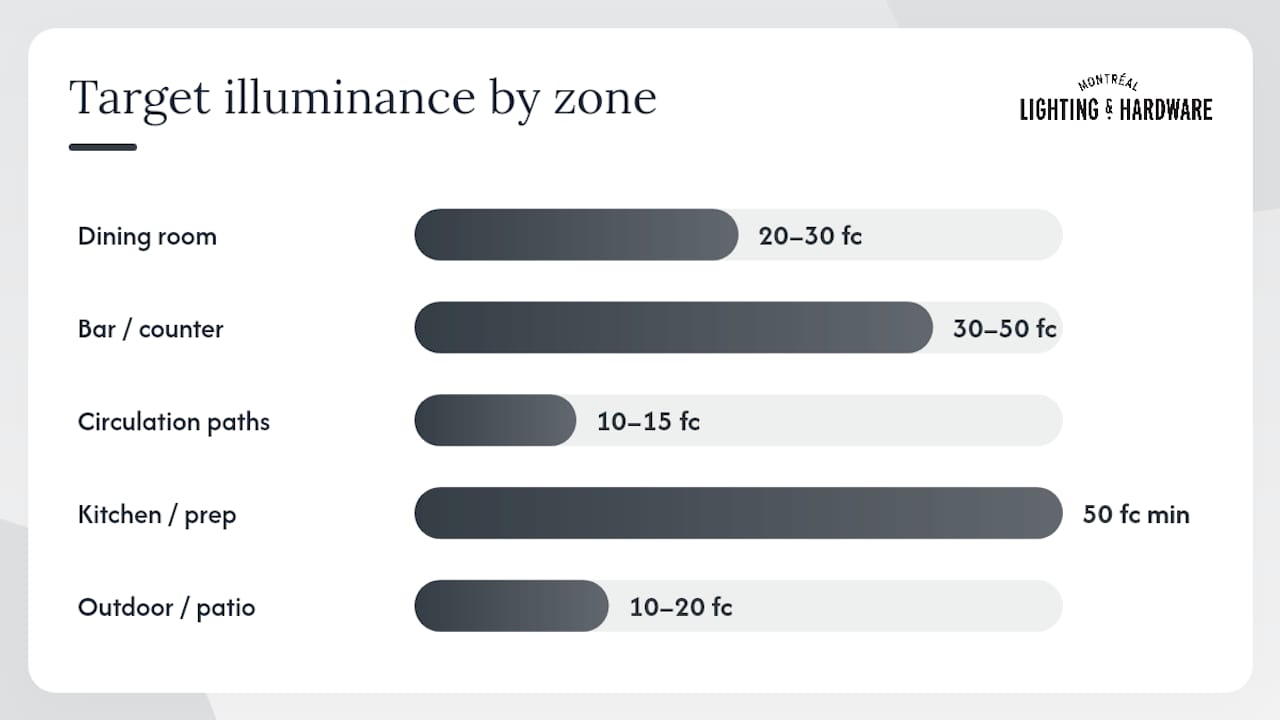
Kitchen and prep areas carry non-negotiable food-safety thresholds. Always cross-check your lumen estimates against local food-safety minimums. The LumenCalculator tool provides a lumen-method estimate and includes built-in Food Code minimum checks for support areas, making it a practical first pass before engaging a lighting designer.
Dimming and control checklist:
- Specify DALI-2 or 0–10V dimming on all dimmable circuits; note trailing-edge vs. leading-edge requirements for LED drivers
- Request a driver compatibility report from every fixture supplier before purchase
- Confirm minimum dim level (target 1–5% for dining areas) and test for flicker at low levels
- Require smooth scene-fade capability (3–5 second transitions) in the control platform spec
Cooper Carry designers report that coordinating different dimming systems and driver compatibility across fixture types is one of the most frequent technical challenges in restaurant projects. Specifying the protocol upfront, rather than resolving it during installation, saves significant time and cost.
For glare control, specify fixtures with a UGR below 19 for dining areas and request beam angle data: 25–40° for accent sources, 60°+ for ambient wash. Outdoor and damp-location fixtures need a minimum IP65 rating. Always request IES photometric files from suppliers so your lighting designer can run a proper layout simulation before anything ships.
How to match fixtures and placement to each zone
Select fixture types by zone first, then refine by optics and mounting height. The zone defines the functional need; the optics and mounting position determine whether the fixture actually delivers it.
Pendants over dining tables work best when the bottom of the shade sits 28–34 inches above the table surface. Lower than that and guests feel enclosed; higher and the light spreads too broadly to feel intimate. CRI of 90 or higher at 2700K–3000K keeps food colors vivid and skin tones warm. A two-light ceiling mount or a compact three-light grouping works well over four-top tables without overwhelming the sightline.
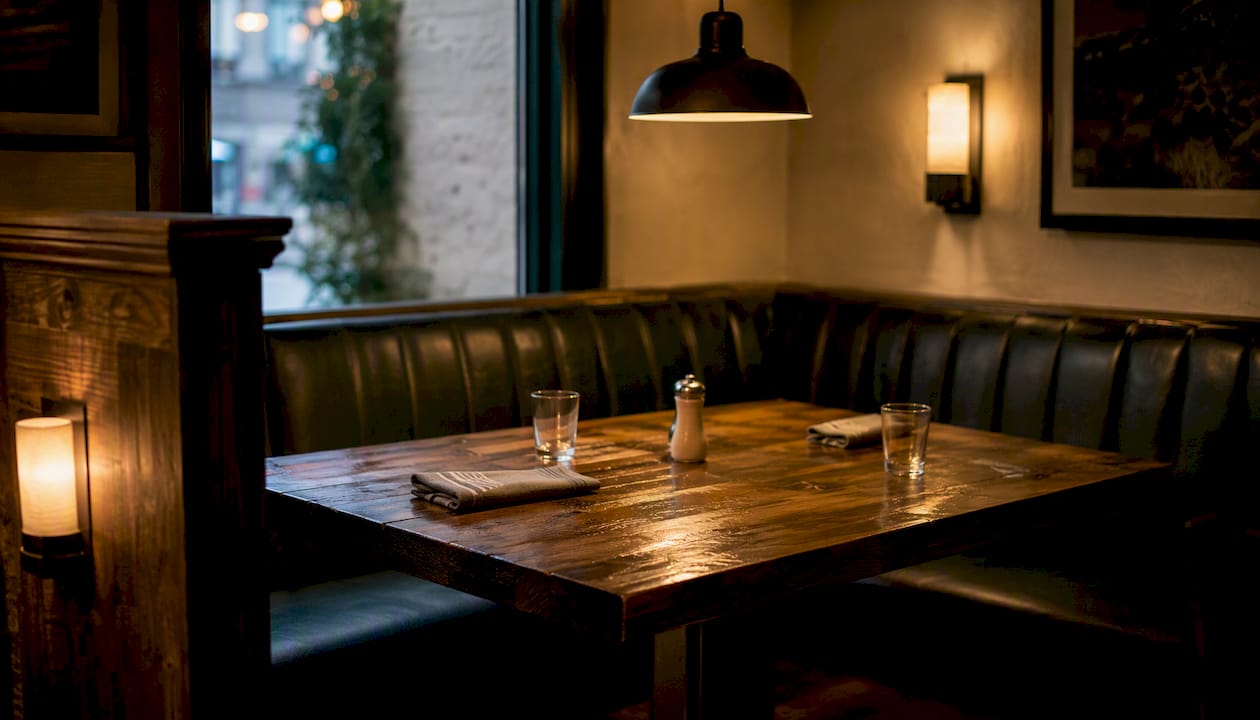
Booths and banquettes benefit from wall sconces or low-hung pendants that keep light close to the table without spilling into adjacent seating. Sconces mounted at 60–66 inches from the floor provide soft fill light while adding a layer of warmth to the vertical surfaces around the booth.
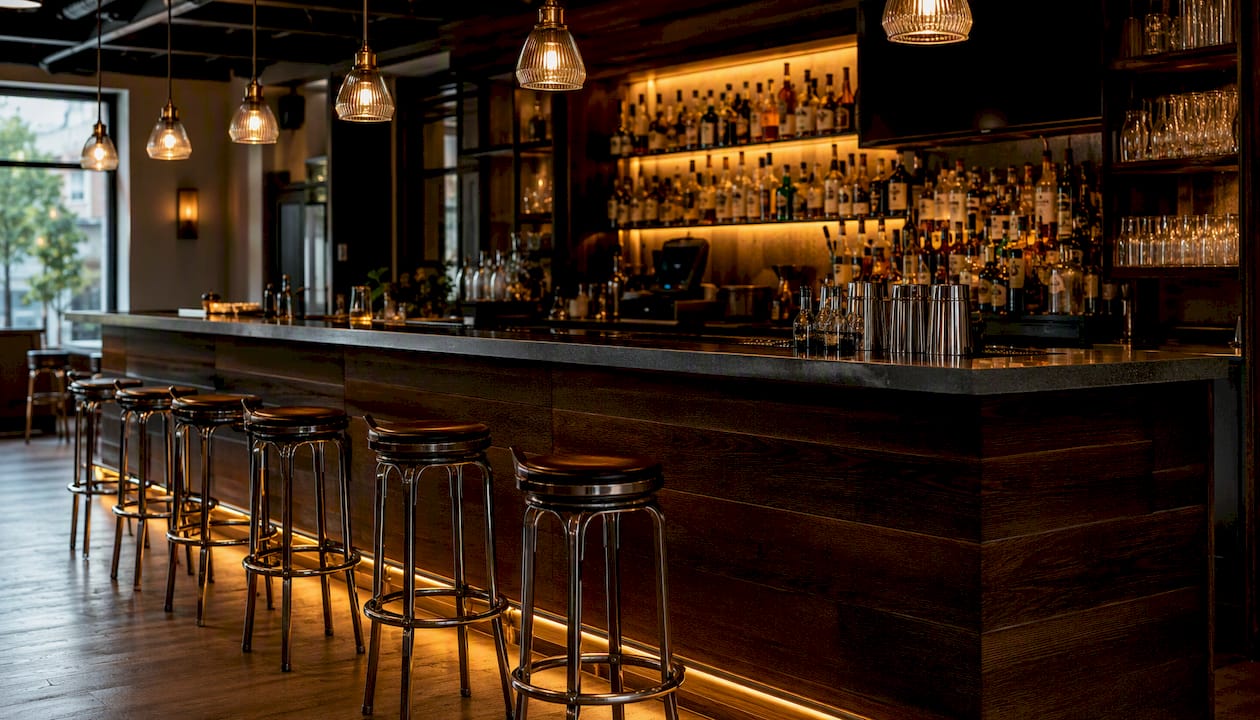
Bar areas need both task and ambient sources. Under-bar LED strips handle the task layer; pendants or recessed fixtures above the bar carry ambient. Keep the back-bar display well-lit at a slightly higher intensity than the seating area to draw the eye and highlight product.
Outdoor patios require IP65-rated fixtures throughout. The Capsule One Light Outdoor Ceiling Mount is a clean, weather-rated option for covered patio ceilings. Canadian climates add a layer of consideration: fixtures in exposed locations should be rated for temperature ranges that include cold winters, and sealed junction boxes prevent moisture ingress during freeze-thaw cycles.
Coordination checklist before closing ceilings:
- Confirm HVAC diffuser and return locations relative to fixture positions
- Mark sprinkler head locations and maintain required clearances
- Note speaker and AV conduit runs to avoid conflicts
- Verify structural blocking for pendant and chandelier mounting points
- Get electrical rough-in inspected before drywall
Smart controls and energy strategies that work in Canada
Require fully dimmable fixtures and a control platform capable of scenes and schedules. That combination gives you the flexibility to shift atmosphere across service periods without touching a single fixture.
Scene-based dayparting is the practical application. Dunne Kozlowski’s guidance reinforces that restaurant lighting must be fully adjustable to account for service periods, daylight changes, and shifting guest expectations.
On the energy side, LED fixtures with proper binning (SDCM ≤ 3 for color consistency across a space) and high-efficiency drivers reduce operating costs significantly compared to older halogen or fluorescent sources. Occupancy sensors in storage rooms, restrooms, and back-of-house corridors add further savings without affecting the guest experience.
Pro Tip: Canadian utility providers including BC Hydro, Enbridge, and local Ontario utilities offer commercial LED retrofit rebates. Ask your supplier for DesignLights Consortium (DLC) qualification data on fixtures — DLC-listed products typically qualify for rebate programs, which can meaningfully reduce payback periods on a full lighting upgrade.
What a restaurant lighting project typically costs and how long it takes
A realistic schedule from brief to commissioning runs 10–16 weeks for a mid-size restaurant, assuming no major structural surprises. Design and specification take 2–4 weeks, procurement adds 4–8 weeks depending on lead times for custom or imported fixtures, and installation plus commissioning typically runs 2–4 weeks.
Budget ranges (lighting scope only, excluding electrical rough-in):
- Entry-level refresh (swap fixtures, no new controls): $5,000–$15,000 CAD for a 2,000 sq ft space
- Mid-range full design (layered lighting, dimmable LED, basic scene control): $20,000–$60,000 CAD
- High-end custom (tunable white, DALI control system, bespoke fixtures, commissioning): $75,000+ CAD
These ranges vary considerably based on ceiling height, number of zones, fixture specification level, and whether the electrical panel needs upgrading. Custom or imported decorative fixtures can shift costs significantly.
Key decision milestones:
- Finalize control strategy and dimming protocol before any fixture is ordered
- Complete photometric layout and get sign-off before procurement closes
- Order sample fixtures and test dimming behavior on-site before full purchase
- Schedule commissioning with the control programmer and electrician together
- Train front-of-house staff on scene recall and manual override before opening
Quick fixture swaps on an existing circuit can be completed in days and cost a fraction of a full system replacement. If the goal is a meaningful atmosphere shift, however, a full layered redesign with proper controls delivers results that a simple bulb swap cannot.
Where to source fixtures and trade services in Canada
Use trade programs and local showrooms to verify color, finish, and dimming behavior before committing to a full order. Seeing a fixture under its own light in a showroom environment reveals things a spec sheet cannot: how the finish reads at 2700K, whether the diffuser creates hot spots, and how smoothly it dims.
Canada-focused coverage notes that chain restaurants in Canada often favor cooler LED options for operational consistency, while independent restaurants tend toward warmer tones that reinforce a distinct identity. Neither approach is wrong; the choice should follow your brand and your guest experience goals, not default operational convenience.
Procurement checklist:
- Request IES photometric files for every fixture in the layout
- Ask for a binning report (SDCM ≤ 3) for all LED sources in the dining area
- Confirm dimming compatibility with your specified control protocol before ordering
- Get lead-time commitments in writing, with contingency dates for opening schedules
- Clarify return and warranty terms for commercial quantities
Trade programs typically offer better pricing, dedicated account support, and faster access to product data. If you’re working with an interior designer or lighting consultant, a designer trade program can extend those benefits to the full project team, simplifying procurement coordination.
Pro Tip: Bring a physical sample of your wall finish, table surface, and upholstery fabric to a showroom consultation. Lighting reads differently against warm wood than against white plaster, and testing your actual palette under the fixture’s light is the only reliable way to confirm the final effect.
For top lighting stores in Canada, look for suppliers who provide photometric support, carry commercial-grade lines, and can confirm DLC qualification for rebate eligibility.
What we’ve learned from real restaurant lighting projects
The most common mistake we see isn’t choosing the wrong fixture. It’s finalizing fixture selections before the control strategy is confirmed. A beautiful pendant that dims beautifully on a trailing-edge driver will flicker and hum on a leading-edge dimmer. That incompatibility doesn’t show up until commissioning, and fixing it after installation means pulling fixtures, swapping drivers, or replacing dimmers. Specifying the dimming protocol first, then selecting fixtures that match it, eliminates that problem entirely.
Ceiling coordination is the second most common source of rework. HVAC diffusers, sprinkler heads, and speaker locations all compete for ceiling real estate. When those trades aren’t coordinated before rough-in, fixtures end up repositioned or blocked, and the photometric layout no longer matches the design intent. The fix is straightforward: hold a ceiling coordination meeting with all trades before any rough-in begins, and mark every ceiling penetration on a single reflected ceiling plan.
On commissioning: program your scenes before the furniture arrives, then re-evaluate them once tables, chairs, and soft furnishings are in place. Train your front-of-house staff on scene recall and manual override on the same day. A lighting system that staff don’t understand will default to “full bright” within a week of opening.
Montreal Lighting & Hardware brings trade-level support to Canadian operators
Canadian restaurant owners and designers get a clearer path from spec to installation when they work with a supplier who understands both the technical side and the procurement reality of the Canadian market.

Montreal Lighting & Hardware offers trade pricing, showroom access, and fast shipping across Canada, with a product range that includes commercial-grade pendants, ceiling mounts, and outdoor-rated fixtures from designer brands. Whether you’re specifying a statement dining room chandelier or sourcing outdoor patio fixtures rated for Canadian winters, the trade program gives you dedicated account support, photometric data on request, and pricing that reflects the scale of a commercial project. Bring your target CCT, CRI requirements, and control platform spec to a trade consultation, and the team can help you match fixtures to your layout before anything ships.
Sources
These references support deeper technical work and procurement decisions for Canadian restaurant lighting projects.
- Shining A Spotlight on Restaurant Lighting - Cooper Carry
- Why Restaurant Lighting Design Matters: A Layered Approach to Ambiance and Revenue - Dunne Kozlowski
- Restaurant lighting basics and ideas - WebstaurantStore
- Restaurant Lighting Calculator - LumenCalculator
