

For most rooms, the fastest rule is simple: divide your ceiling height by two to get your spacing. An 8-foot ceiling gives you about half the ceiling height as the spacing between fixtures. For a more precise layout, use the manufacturer’s Spacing Criterion (SC): Spacing = SC × mounting height. SC values typically fall between 0.5 and 1.5, and they appear on every fixture’s spec sheet.
Two quick rules to keep on your sketch:
- Rule-of-thumb: Ceiling height ÷ 2 = spacing between fixtures (e.g., 8 ft ÷ 2 = 4 ft)
- SC formula: Spacing = SC × mounting height (use this when the spec sheet lists an SC value)
The ceiling-height rule works well for a first pass. Once you’ve chosen a specific fixture, confirm its SC value on the spec sheet, as it accounts for the fixture’s beam spread and lumen performance. The sections below walk through both methods with worked room examples, a buyer checklist, and Canadian sourcing notes from Montreal Lighting & Hardware.
Table of Contents
- How recessed lighting spacing formulas actually work
- Worked examples for three common rooms
- How fixture size and beam angle change your layout
- Practical placement rules that make a real difference
- Why checking the spec sheet and local code matters
- A practical checklist for buying recessed lights in Canada
- Key Takeaways
- What homeowners most often get wrong about recessed lighting
- Ready to plan your layout with the right fixtures
- Useful sources and calculator tools
How recessed lighting spacing formulas actually work
The ceiling-height ÷ 2 rule is a starting point, not a finish line. It assumes a standard 8-foot ceiling and a mid-range beam angle. For most living rooms and bedrooms, it produces a reasonable grid. For kitchens, sloped ceilings, or high-output LED wafers, you need the SC method.

The Spacing Criterion explained. SC is a dimensionless number, typically between 0.5 and 1.5, that manufacturers derive from photometric testing. Multiply it by your mounting height (the distance from the floor to the fixture) and you get the maximum center-to-center spacing that still delivers even illumination. A fixture with SC around 1.0 on a 9-foot ceiling allows spacing up to the ceiling height itself, while lower SC values reduce the maximum allowed spacing.
Most residential LED wafers and canless downlights list SC values in a typical range above 0.7, while older narrow-beam cans often need denser layouts due to lower SC values. Eaton’s spacing guidance confirms that SC overrides general rules-of-thumb whenever a spec sheet is available.
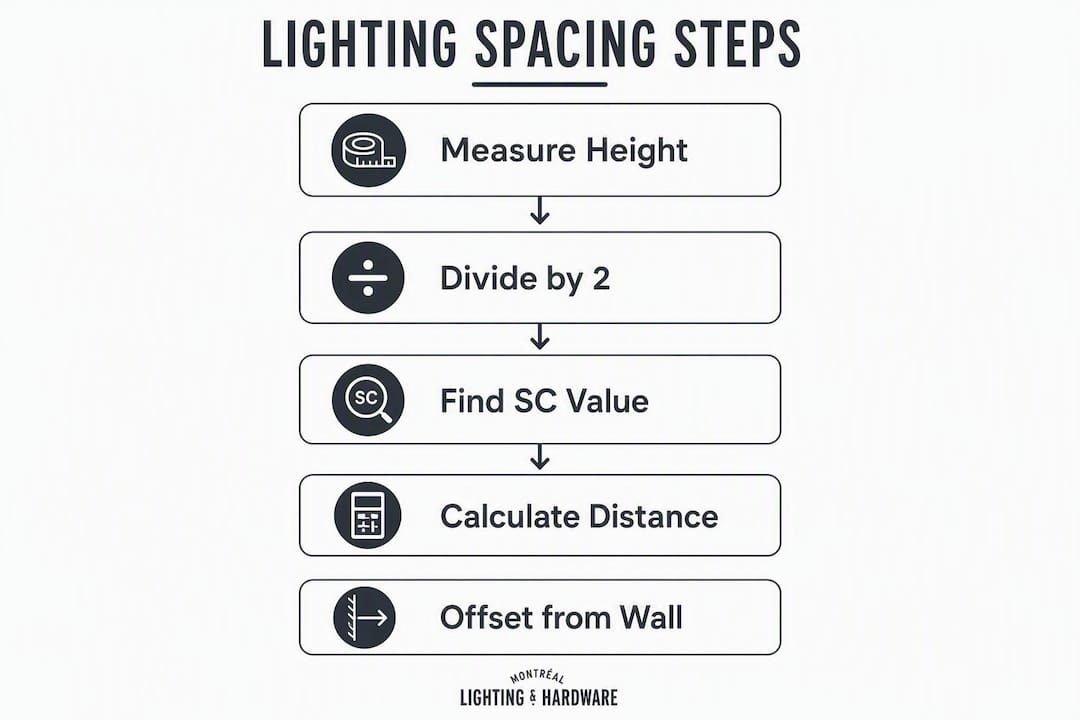
Wall offset. Place your first row of fixtures at roughly half the fixture spacing from the wall. Placing fixtures too close to the wall often produces uneven light patterns unless intentionally wall-grazing. The typical residential wall offset lands between 18 and 36 inches.
When to tighten or widen spacing. Narrow beam angles, task areas, dark finishes, and lower lumen output typically require tighter spacing, while wide beams, high lumen LEDs, and layered lighting permit wider spacing. Tighter spacing costs more in fixtures and installation; wider spacing risks dark patches if the beam spread doesn’t cover the gap.
Pro Tip: Canless LED wafers often carry higher SC values than older recessed housings because their wide beam angles spread light more evenly. If you’re retrofitting, check the new wafer’s SC before assuming you need the same number of holes as the original layout.
Worked examples for three common rooms
The best way to internalize spacing rules is to run the numbers on real rooms. Below are three examples you can adapt directly.
Step-by-step workflow
- Measure the room (length × width) and note ceiling height.
- Choose your fixture and note its SC value and beam angle from the spec sheet.
- Apply the SC formula (or ceiling-height ÷ 2 for a quick pass).
- Calculate how many rows fit along each dimension, starting from the wall offset.
- Adjust positions to align with furniture, task zones, and any ceiling obstructions.
- Confirm total fixture count against your lumen budget.
Example A: 12×12 bedroom, 8-foot ceiling
Ceiling height ÷ 2 = 4-foot spacing. Wall offset = 2 feet. Starting 2 feet from the wall and spacing every 4 feet, you fit two positions along each 12-foot run: one at 2 feet, one at 6 feet (the next would land at 10 feet, which is within 2 feet of the opposite wall). So you center the pair at 3 feet and 9 feet instead. That gives a 2×2 grid, or 4 fixtures total. For a bedroom, 4 well-placed fixtures with a dimmer is usually enough, especially when layered with a bedside lamp or a decorative ceiling mount.
Example B: 20×20 living room, 9-foot ceiling
Rule-of-thumb: 9 ÷ 2 = 4.5 feet. Along a 20-foot run, starting at 2.25 feet from the wall: positions at 2.25, 6.75, 11.25, and 15.75 feet — that’s 4 positions per row, 4 rows, or 16 fixtures. Now run the SC method with a typical SC of 1.0: 1.0 × 9 = 9-foot maximum spacing. Starting at 4.5 feet from the wall, you get two positions per run (4.5 and 13.5 feet), giving a 2×2 grid of 4 fixtures. The gap between 16 and 4 illustrates why the SC method matters. For a living room, 9 fixtures (a 3×3 grid at roughly 5-foot spacing) often hits the right balance, with the remaining light handled by floor lamps and wall-mount fixtures rather than ceiling penetrations.
Avoid placing any fixture directly in line with your TV wall. Shift that row forward or back by 18 inches to prevent glare on the screen and reflections in your eyes when seated.
Example C: Kitchen counter run and island
Kitchens need denser layouts than living rooms because task lighting demands more lumens per square foot. For a counter run, place fixtures 24–30 inches out from the wall so a person standing at the counter doesn’t cast a shadow on the work surface. Along a 12-foot counter, spacing fixtures every 3–4 feet gives you 3–4 fixtures in that row. The island gets its own treatment: a centered row of recessed lights above it, or pendant fixtures hung 30–36 inches above the surface for a warmer, more focused look.
| Room | Dimensions | Ceiling height | Spacing used | Fixture count |
|---|---|---|---|---|
| Bedroom | 12×12 ft | 8 ft | 4 ft (rule-of-thumb) | 4 |
| Living room | 20×20 ft | 9 ft | 4.5–9 ft (depending on method) | 4–9 |
| Kitchen counter | 12 ft run | 8 ft | 3–4 ft (task) | 3–4 |
The DIYdigits recessed lighting calculator is a fast way to verify these numbers once you’ve chosen a specific fixture.
How fixture size and beam angle change your layout
Aperture size and beam spread are two variables that most homeowners overlook until the fixtures are already in the ceiling. Getting them right before you cut holes saves a lot of regret.
4-inch vs. 6-inch apertures. A 4-inch trim looks refined and almost disappears into the ceiling, which suits lower ceilings and tighter spaces. On a 10-foot or higher ceiling, 4-inch fixtures spaced widely can look sparse and visually disconnected. Eaton’s aperture guidance notes that fixture spec matters more as ceiling heights increase, and designers often move to 6-inch trims in larger, taller rooms to maintain visual balance. Six-inch fixtures also tend to carry higher lumen outputs, which can reduce the total number of fixtures you need.
Beam angle and spacing. Beam angle is as important as spacing: a 25° narrow spot needs fixtures every 2–3 feet to avoid dark gaps, while a 60° flood can cover a 5–6 foot spread comfortably. Most residential LED wafers ship with beam angles between 38° and 60°, which is why they tend to have higher SC values and allow wider spacing than older halogen cans.
| Beam angle | Typical use | Effect on spacing |
|---|---|---|
| 15°–25° (spot) | Accent, artwork | Tighter grid needed |
| 30° (narrow flood) | Task, kitchen | Moderate spacing |
| 60° (flood) | General ambient | Wider spacing allowed |
Lumen output. A modern 4-inch LED wafer can deliver 650–900 lumens, comparable to many 6-inch fixtures from a decade ago. Higher lumen output lets you use fewer fixtures without sacrificing brightness. Fewer well-placed fixtures with higher-output LEDs can also reduce total wattage and energy costs compared to a denser grid of lower-output lamps.
Pro Tip: Rather than changing your whole-grid spacing to handle accent or task areas, use adjustable-trim fixtures in those zones. A gimbal or eyeball trim lets you redirect the beam without adding more holes.
Practical placement rules that make a real difference
Numbers on paper become a real lighting plan only when you account for what’s actually in the room. Layered lighting that follows furniture and task zones consistently outperforms a purely geometric ceiling grid.
Wall offset in practice. Half the fixture spacing is the standard starting point. For a 4-foot grid, that’s 2 feet from the wall. For a 5-foot grid, start at 2.5 feet. This keeps perimeter light balanced and prevents the fixtures from washing the wall with uneven scallops. The 18–36 inch range covers most residential situations.
Align with the room, not the ceiling. Place fixtures to light where people sit, cook, read, and work. A sofa grouping benefits from fixtures centered above the seating area, not offset toward the room’s geometric center. A reading chair deserves its own fixture positioned slightly in front of the seat, not directly overhead where it creates glare.
Recessed lighting placed directly above a viewer’s eye line creates glare and flattens faces. Shift fixtures 12–18 inches forward of seating positions so light falls on the task or the person’s hands, not into their eyes.
Ceiling irregularities. Exposed beams, joist runs, and sloped ceilings all require adjustments. On a vaulted ceiling, measure mounting height at the fixture’s actual installation point, not the room’s average height. Sloped ceilings often need slope-rated housings and adjustable trims to keep the beam aimed straight down. Beams can anchor a row of fixtures on each side rather than forcing a centered grid that crosses the beam.
Quick layout dos and don’ts:
- Do center fixtures over seating zones and task surfaces.
- Do offset the first row from the wall by half the fixture spacing.
- Don’t place fixtures directly above a TV or monitor screen.
- Don’t run a single centered row in a wide room; two offset rows distribute light more evenly.
- Do use wall-mount fixtures or floor lamps to fill corners rather than adding more ceiling penetrations.
- Don’t ignore furniture placement when marking fixture positions.
Why checking the spec sheet and local code matters
General rules-of-thumb are useful starting points. The fixture’s spec sheet is the authority. And for any new circuit or structural ceiling work, a licensed electrician is the professional to call.
SC on the spec sheet. The Spacing Criterion printed on the fixture’s data sheet reflects actual photometric testing for that specific product. It overrides the ceiling-height rule whenever the two conflict. If a fixture lists SC 0.8 and your rule-of-thumb suggests 4.5-foot spacing on a 9-foot ceiling, the SC caps you at 7.2 feet maximum. That’s a meaningful difference in fixture count.
Key spec-sheet items to verify before buying:
- SC value and the formula result for your ceiling height
- Lumen output and color temperature (2700K–3000K for living areas; 3000K–4000K for kitchens)
- Beam angle
- IC rating (required when the fixture will contact insulation in the ceiling cavity)
- Wet-location or shower-trim rating for bathrooms
- Dimmer compatibility (not all LED drivers work with every dimmer switch)
Before purchasing, confirm that your chosen fixture is IC-rated if your ceiling has insulation above it. Installing a non-IC fixture in an insulated ceiling is a fire hazard and a code violation in Canada.
Canadian electrical code. Electrical work in Canada falls under the Canadian Electrical Code (CEC), administered provincially. New circuits, panel connections, and any work inside walls or ceilings typically require a permit and a licensed electrician. Even confident DIYers should have a licensed electrician handle the rough-in wiring and final inspection. The fixture placement and layout math is well within DIY territory; the wiring is not.
Pro Tip: When consulting your electrician or supplier, ask three specific questions: What SC value does this fixture carry? What lumen package do you recommend for this room size and ceiling height? And which dimmer models are confirmed compatible with this LED driver?
A practical checklist for buying recessed lights in Canada
Having the right specs written down before you shop saves time and prevents mismatches. Use this list at the point of purchase.
Fixture spec checklist:
- Fixture type: canless LED wafer or traditional can with housing
- Aperture size: 4-inch or 6-inch (match to ceiling height and room scale)
- SC value: confirm it’s listed on the spec sheet and run the formula for your ceiling
- Lumen output: target 600–900 lumens per fixture for general ambient; higher for task areas
- Color temperature: 2700K–3000K for bedrooms and living rooms; 3000K–4000K for kitchens
- Beam angle: 38°–60° for general ambient; narrower for accent or task
- IC rating: required for insulated ceilings
- Wet/damp location rating: required for bathrooms and covered outdoor areas
- Dimmer compatibility: confirm with the specific dimmer model you plan to use
- Warranty: look for at least a 3-year warranty on LED drivers
Buying in Canada. Montreal Lighting & Hardware carries a curated selection of fixtures from designer brands, with fast shipping across Canada and a trade program for designers and contractors who need volume pricing and specification support. Their showroom team can help you match SC values, lumen packages, and color temperatures to your specific rooms before you commit to a layout. Just as you’d weigh price versus quality tradeoffs on any interior finish, choosing fixtures with a confirmed SC and a solid warranty protects your renovation investment.
For living areas, warm LED wafers in the 2700K–2800K range create a soft, inviting glow that feels natural rather than clinical. Confirm the return policy and shipping timeline before ordering, especially for renovation projects with fixed drywall deadlines.
Key Takeaways
Proper recessed lighting spacing starts with ceiling height ÷ 2 as a quick estimate, then refines to the manufacturer’s Spacing Criterion formula for a layout that actually performs.
| Point | Details |
|---|---|
| Use ceiling height ÷ 2 first | An 8-foot ceiling gives roughly 4-foot spacing as a starting estimate. |
| SC formula is the precise method | Spacing = SC × mounting height; SC typically ranges 0.5–1.5 per manufacturer specs. |
| Wall offset matters | Place the first row at half the fixture spacing from the wall, commonly 18–36 inches. |
| Task zones need tighter spacing | Kitchens and counters require denser layouts and fixtures placed 24–30 inches from the wall. |
| Montreal Lighting & Hardware | Offers fixture selection with SC-verified specs, trade pricing, and fast Canadian shipping. |
What homeowners most often get wrong about recessed lighting
The most common regret we hear at Montreal Lighting & Hardware isn’t under-lighting. It’s the opposite. Homeowners plan a dense grid of 12 or 16 fixtures in a living room, install them all, and then find the space feels like a grocery store at full brightness. The ceiling looks busy, the light is flat, and there’s nowhere for the eye to rest.
The fix isn’t more fixtures. It’s fewer fixtures, better placed, paired with dimmers and layered with decorative ceiling mounts or wall fixtures that add warmth and depth. A living room with 6 well-spaced recessed lights on a dimmer, a floor lamp beside the sofa, and a pendant over the dining table will feel more alive than 16 evenly spaced cans at full blast.
The manufacturer SC method exists precisely to prevent over-lighting. When a fixture’s SC is 1.0 and your ceiling is 9 feet, the math tells you that 9-foot spacing delivers even illumination. Tightening that to 4 feet doesn’t double your light quality; it doubles your fixture count and your energy bill while creating glare.
Use the worked examples and checklist in this guide before you order. Mark positions on a floor plan, run the SC formula, and then ask yourself whether each fixture is lighting something specific — a seating zone, a counter, a piece of art — or just filling ceiling space.
Ready to plan your layout with the right fixtures
Montreal Lighting & Hardware makes it straightforward to go from spacing math to finished ceiling. Browse a curated selection of canless LED wafers, adjustable trims, and designer fixtures, all with spec sheets that list SC values, lumen outputs, and dimmer compatibility.

The trade program offers exclusive pricing for designers and contractors working on multiple rooms or full renovations, with fast shipping across Canada. Whether you’re sourcing 4 fixtures for a bedroom or speccing out a full home renovation, the showroom team can help you match fixtures to your ceiling heights, room functions, and aesthetic goals. Visit Montreal Lighting & Hardware to browse the full collection, confirm specs, and get your layout right before the drywall goes up.
Useful sources and calculator tools
| Resource | Type | What it offers |
|---|---|---|
| Eaton: Spacing Guide for Recessed LED Lighting | Manufacturer guide | SC formula, beam angle guidance, and aperture advice from a major fixture manufacturer |
| DIYdigits Recessed Lighting Calculator | Free calculator | Enter room dimensions and ceiling height to generate fixture count and layout estimates |
| Copperview: Recessed Lighting Layout & Install | Installation guide | Ceiling-height rule, kitchen placement (24–30 in off wall), and practical layout steps |
| Home Depot Canada: Pot Lights Spacing | Canadian DIY guide | Canadian-market guidance on pot light spacing and layout for residential rooms |
| IES: Illuminating Engineering Society | Industry standard | Layered lighting principles and task-based layout recommendations from the leading North American lighting authority |
| Home Lighting Tips: Recessed Lighting Spacing | Design reference | Explains why generic spacing rules mislead and how manufacturer specs should guide decisions |
The Home Depot Canada guide is particularly useful for Canadian homeowners because it reflects local product availability and pot-light terminology common in Canadian renovation projects. For a fast layout check, run your room dimensions through the DIYdigits calculator, then verify the output against your chosen fixture’s SC value from the Eaton guide.
