


For a 48-inch mirror, that means a 36–38 inch bar. That single calculation handles the majority of bathroom layouts cleanly and confidently.
Before you shop, keep these quick rules in hand:
- Measure your mirror edge-to-edge, then multiply by 0.75 to get your target fixture width.
- Round to the nearest standard fixture size (typically sold in 2-inch increments).
- For flanking side sconces, sizing rules shift — the fixture width matters less than the mounting height and spacing from the mirror edge.
- Very wide vanities (60 inches and up) often look better with two coordinated fixtures than one long bar.
Key Takeaways
| Point | Details |
|---|---|
| Core sizing rule | Target fixture width at 75% of mirror width; stay within the 70–80% range based on fixture style. |
| Mounting height | Side sconces center at 60–65 in from the floor; above-bar fixtures sit 6–8 in above the mirror top. |
| Light quality specs | Aim for 1,500–3,000 lumens, CRI 90+, and 2700K–3000K color temperature for most bathrooms. |
| Canadian safety ratings | Confirm CSA Group certification and damp or wet location listing before installing any bathroom fixture. |
| Montreal Lighting & Hardware | Browse vanity bars and sconces sized for Canadian bathrooms, with trade pricing and showroom access. |
Table of Contents
- What vanity light size should you choose?
- How to measure for your vanity light
- Quick reference: common mirror widths and fixture sizes
- Single-sink vs. double-sink vanity layouts
- Where should you mount a vanity light?
- Brightness, color quality, and Canadian safety ratings
- How visual weight changes the sizing rule
- Common vanity lighting mistakes and how to fix them
- Installation basics and when to call a licensed electrician
- Our perspective on getting vanity lighting right
- Find your next vanity light at Montreal Lighting & Hardware
- Sources
What vanity light size should you choose?
Sizing ranges confirm this: a mirror in the 36–48 inch range typically pairs with a fixture between 30–40 inches; a 30–36 inch mirror works well with a 24–30 inch bar.
- Slim linear LED bars can sit at the upper end of the range (closer to 80%) without feeling heavy. Their low visual mass lets them stretch wider without dominating the mirror.
- Heavy glass shades or metal clusters should sit toward the lower end (closer to 70%). The physical bulk of each shade adds perceived width beyond the fixture’s actual measurement.
- Bold finishes (matte black, brushed gold) read heavier than chrome or satin nickel at the same size. Size down slightly when the finish is dark or high-contrast.
When your mirror is unusually tall or your bathroom ceiling is low, scale toward the narrower end so the fixture doesn’t visually compress the space.
Pro Tip: When in doubt, size to the mirror width, not the vanity cabinet. The mirror is what the eye reads as the anchor, and the fixture should frame it, not the countertop below.
How to measure for your vanity light
A reliable planning template starts with four measurements recorded before you open a single product page.
- Measure mirror width edge-to-edge, including any frame. This is your primary reference number.
- Note vanity cabinet width as a cross-check. Your fixture should never exceed the cabinet width, even if the 75% calculation suggests a wider bar.
- Measure from mirror top to ceiling. You need at least 6–8 inches of clearance above the mirror for an above-bar fixture to sit properly as task lighting rather than ambient wash.
- Record the junction box position. If the box is already roughed in, your fixture’s center must align with it. Confirm whether it’s centered on the mirror or offset before ordering.
After measuring, calculate your target width and check it against standard fixture sizes:
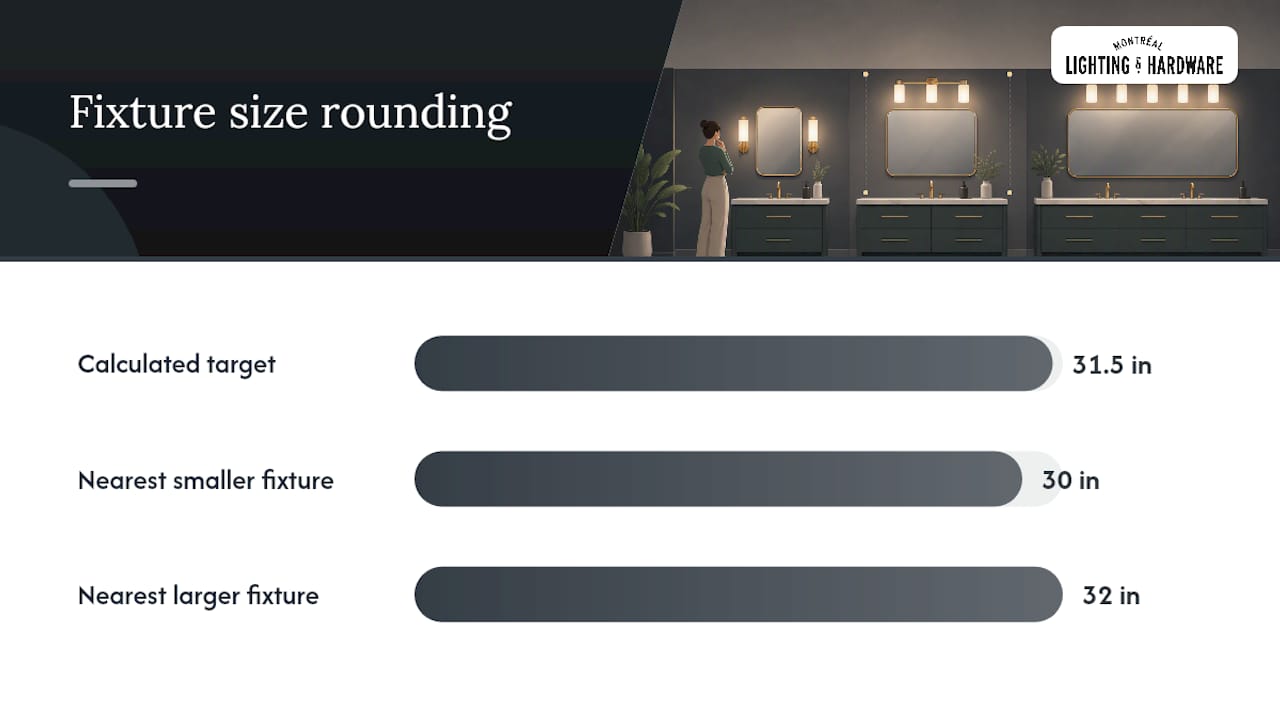
Round your calculated width to the nearest available fixture size. Most bars are sold in 2-inch increments, so a 31.5-inch target becomes a 30- or 32-inch fixture depending on what your chosen style offers.
Quick reference: common mirror widths and fixture sizes
For a 48-inch mirror, a 36–38 inch bar is the standard recommendation. The table above covers the most common Canadian bathroom mirror widths from 24 to 72 inches.
A few practical notes on reading those numbers:
- The “practical range” column accounts for fixture visual weight. A slim LED bar can land at the top of the range; a multi-shade fixture should land at the bottom.
- Metric conversions are rounded to the nearest centimeter. Canadian fixture packaging often lists both imperial and metric, but most fixtures are manufactured to imperial dimensions.
- At 60 inches and wider, a single bar can start to feel institutional. Two coordinated 24–28 inch fixtures, one centered over each sink, usually read more naturally.
Single-sink vs. double-sink vanity layouts
The junction box is typically centered on the wall, and most standard fixtures align without modification.
Double-sink vanities open up more choices, and the right answer depends on your mirror configuration.
- One long shared mirror with one long bar: works when the bar spans 75% of the full mirror width and the junction box is centered. Clean, cohesive, and easy to install. A vanity bar like the Jennings LED suits this layout well.
- One long mirror with two smaller fixtures: useful when a single bar at 75% would be too long to source easily, or when you want to create visual rhythm above a wide mirror. Space the two fixtures evenly, each centered roughly above its respective sink.
- Two separate mirrors with one fixture each: the most task-lighting-friendly layout. Size each fixture to 75% of its own mirror. Each person gets their own light source, which dramatically reduces shadows.
Flanking sconces placed at eye level provide the most even facial lighting of any configuration. Photographers and makeup artists prefer this setup because the light wraps the face from both sides, eliminating the harsh chin and forehead shadows that a single overhead bar creates.
Pro Tip: Before finalizing your junction box position on a double vanity, sketch the mirror and fixture positions on paper. A small layout drawing prevents costly electrical moves later, especially if you plan to upgrade mirrors in the future.
Where should you mount a vanity light?
Mounting height shapes how the light actually performs. For side sconces, center the fixture at 60–65 inches from the finished floor to align the light source with eye level. For above-mirror bars, aim for 6–8 inches above the mirror’s top edge so the fixture functions as task lighting rather than a ceiling wash.
Those numbers are starting points, not absolutes.
- Taller households (primary users over 6 feet) can shift sconces up 2–3 inches without losing the eye-level benefit.
- A very tall mirror that already reaches close to the ceiling may force the bar higher. In that case, prioritize clearance above the mirror over the 6–8 inch ideal.
- Low ceilings (under 8 feet) sometimes require a flush or semi-flush fixture rather than a pendant-style bar to maintain safe clearance.
Side sconces vs. above-bar: side sconces win on shadow quality. The light hits the face from both sides, which is ideal for grooming and makeup. Above-bar fixtures work well when wall space beside the mirror is limited or when a single cohesive look is the priority. Using both together is possible, but stagger the brightness so one source leads and the other fills rather than competing.
Pro Tip: If you’re using an above-bar fixture and side sconces together, connect them to separate switches or a single dimmer with two channels. That way you can dial down the bar for ambient mood and keep the sconces bright for task lighting.
Brightness, color quality, and Canadian safety ratings
Lumens tell you how much light a fixture actually delivers. For a single-sink vanity, plan for roughly 1,500–3,000 lumens depending on mirror size, fixture efficiency, and whether you have supporting ceiling light. Watts are largely irrelevant for LED fixtures — a 15-watt LED can outperform a 60-watt incandescent.
Color quality matters just as much as brightness:
- Color temperature: 2700K–3000K is the reliable residential sweet spot. It reads as warm white, flattering to skin tones, and comfortable for daily use. 3000K is a safe default if you’re unsure.
- CRI (Color Rendering Index): look for CRI 90 or higher when color accuracy matters, such as for makeup application or matching clothing. A CRI below 80 can make skin tones look flat or slightly off.
- Dimming: choose fixtures rated for dimmer compatibility and pair them with a compatible dimmer switch. Not all LED drivers work with all dimmers — check the fixture spec sheet for a recommended dimmer list.
For Canadian buyers, two certifications matter before purchase. Check for ENERGY STAR Canada ratings for efficiency guidance on fixtures and bulbs. For safety, look for a CSA Group mark on the fixture label — this confirms the product has been tested and certified for Canadian electrical standards.
Bathroom location ratings are non-negotiable. Fixtures installed directly above a tub or shower must carry a wet location listing. Fixtures within the general bathroom but not directly above water need at minimum a damp location listing. A dry-rated fixture in a bathroom is a code violation and a safety risk.
How visual weight changes the sizing rule
Visual weight is the perceived heaviness of a fixture based on its shade size, finish, material, and overall silhouette. Two fixtures with identical measurements can look completely different on the wall.
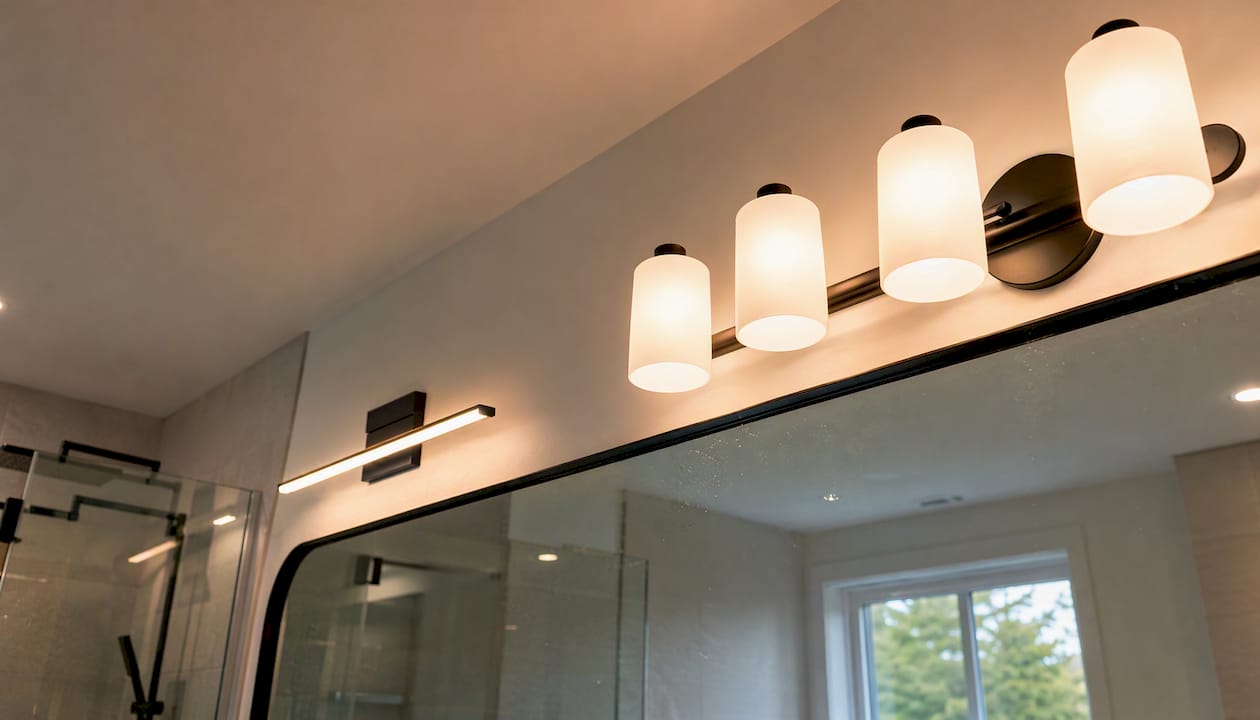
A slim, single-rod LED bar with a matte finish reads light and airy. A four-light fixture with large opal glass shades, like the Palla Four Light Bathroom Vanity, carries significantly more visual mass. On a 48-inch mirror, that style often looks best at 34–36 inches rather than the full 38.
Dark finishes add visual weight. Matte black and oil-rubbed bronze read heavier than polished chrome at the same physical size. If you love a bold finish, size toward the lower end of your range and let the finish do the decorative work.
Pro Tip: Cut a strip of painter’s tape to your calculated fixture width and press it to the wall above your mirror before ordering. Step back and look at it in your bathroom’s natural and artificial light. This two-minute test has saved many homeowners from returning a fixture that looked perfect online but felt wrong in the room.
Common vanity lighting mistakes and how to fix them
Most sizing and placement problems fall into a short list of repeatable errors.
Common mistakes:
- Fixture too narrow for the mirror, leaving the outer edges dim and unlit
- Bar mounted too high, turning task light into ambient ceiling wash
- Relying solely on an overhead ceiling fixture for bathroom lighting
- Wrong color temperature (above 4000K reads clinical and harsh in most residential baths)
- Ignoring damp or wet location ratings when installing near a tub or shower
Quick fixes and diagnostics:
- If shadows fall under your chin and nose, your above-bar fixture is mounted too high. Lower it toward the 6–8 inch mark above the mirror top, or add side sconces at 60–65 inches from the floor.
- If the mirror edges look dim, your fixture is undersized. Measure the mirror again and recalculate 75% — you may need to step up one fixture size.
- If the light feels harsh or unflattering, check the color temperature. Swap to a 2700K–3000K bulb before replacing the fixture.
- Before purchasing, run this quick checklist: mirror width measured, 75% calculated, junction box position confirmed, lumens and CRI noted, damp/wet rating verified.
Installation basics and when to call a licensed electrician
Most above-mirror bar replacements are straightforward swaps: power off at the breaker, confirm the existing junction box is rated for the fixture’s weight, connect the wires, and mount. The Dixon Three Light Bathroom Vanity is a good example of a mid-size fixture that installs on a standard junction box without special hardware.
Before starting any installation, verify:
- The breaker is off and the circuit is confirmed dead with a voltage tester.
- The junction box is rated for the fixture’s weight (most standard boxes support up to 35 lbs; heavier fixtures need a fan-rated or brace-mounted box).
- The fixture carries the correct damp or wet location listing for its bathroom position.
- Your dimmer switch is compatible with the fixture’s LED driver.
Call a licensed electrician when there is no existing junction box, when you need to move the supply to a new location, when the wiring looks unfamiliar or older than 25 years, or when the fixture is heavy and requires a new brace. In Canada, electrical work in bathrooms is regulated under provincial electrical codes, and permits may be required for new circuits or relocated outlets. Always confirm local requirements before starting.
Safety callout: never work on a live circuit. Bathroom environments combine water and electricity, and the margin for error is zero. When in doubt, hire a licensed electrician.
Our perspective on getting vanity lighting right
They skip the visual weight check, ignore the mounting height, and order without confirming the CRI or damp rating. The fixture arrives, looks slightly off, and the return process begins.
The better approach is to treat sizing as one layer of a short checklist: width first, then visual weight, then placement height, then light quality, then safety rating. Each layer takes about five minutes to think through. Together, they turn a guess into a confident decision.
One more thing worth saying plainly: side sconces are underused in Canadian bathrooms. Above-bar fixtures are the default because they’re simpler to wire, but a pair of sconces at eye level will outperform almost any single overhead bar for everyday grooming. If your renovation budget allows for a second junction box, it’s worth the investment.
Find your next vanity light at Montreal Lighting & Hardware
You’ve done the measuring. You know your fixture width, your mounting height, and the CRI you need. The next step is finding a fixture that actually fits those numbers and feels right in your space.

Montreal Lighting & Hardware carries a curated selection of bathroom vanity lights sized for real Canadian bathrooms, from slim LED bars for compact powder rooms to multi-light fixtures for wide double-vanity layouts. Designer brands like Savoy House and Maxim are stocked alongside more accessible options, so you can match your finish and scale without compromising on quality. Trade professionals get exclusive pricing and dedicated support. And if you want to see a fixture in person before committing, the showroom is there for exactly that. Browse the full collection or reach out to the team for a sizing recommendation tailored to your mirror and layout.
Sources
These references shaped the guidance in this article and are worth bookmarking for your own planning.
- How to get your bathroom vanity lighting right – Houzz
- Lighting
- ENERGY STAR Canada – Natural Resources Canada
- Marks & labels – CSA Group
- How to determine bathroom vanity light sizes – Canarm
Recommended
- Best Bathroom Vanity Lights for Canadian Homeowners – Montreal Lighting & Hardware
- Palla Four Light Bathroom Vanity | Crystorama – Montreal Lighting & Hardware
- Jennings LED Bathroom Vanity | Crystorama – Montreal Lighting & Hardware
- Dixon Three Light Bathroom Vanity | Crystorama – Montreal Lighting & Hardware
